Hi Community,
Another day another blog, this time on Windows Autopilot device preparation. On 27 August 2026 Microsoft released a new feature for it called Device Association and for me this is the most interesting Autopilot news in a while.
Device preparation itself is not new. The big win was that you don’t need to register hardware hashes anymore before you can deploy a device. But there is a catch nobody really talks about: the device knows nothing about your tenant until a user signs in. Your device name, your OOBE screens, your policy targeting, all of that is waiting for a user to show up.
Device association fixes that. I had an empty tenant available so i built the whole thing from scratch, from automatic enrollment up to an associated device, so you get every step with screenshots.
In this blog i will cover what device preparation is, what device association does, the full setup, the association flow, the things i ran into and how to do this for more than 1 device. So let’s go!
ℹ️ The official Microsoft docs on device association are here and the announcement from the Intune team is here.
What is Windows Autopilot device preparation?
Short recap for the people who have been busy with other stuff.
Device preparation is the newer and simpler way to configure a Windows device during OOBE. The user powers on the device, connects to a network, signs in with their Entra credentials and the device joins Entra ID, enrolls in Intune, installs up to 25 apps, runs up to 10 PowerShell scripts and sends the user to the desktop.
The difference with classic Autopilot (APv1) is the registration. Classic Autopilot needs the hardware hash uploaded first. Device preparation does not. The policy is assigned to the user and when that user signs in during OOBE the policy follows them to whatever device they are holding.
Which is nice, but it also means nothing can happen before somebody signs in.
What is Device Association?
Device association binds a physical Windows 11 device to your tenant before it enrolls in Intune.
It writes a tenant affinity marker into the UEFI firmware of the device. The device proves its identity with TPM backed attestation, the service gives back a signed answer and Windows stores that answer in firmware. From then on the OOBE screens know which tenant this device belongs to.
And because it sits in UEFI and not in Windows it survives a reset, an OS reinstall and removal of the enrollment.
ℹ️ One thing to get straight before we continue: device association is not a third deployment method next to classic Autopilot and device preparation. It is a feature inside device preparation. You are not choosing between them.
What you get
- A simpler OOBE – the device is recognised before enrollment so you can preconfigure language and keyboard and skip the license and privacy pages.
- Device naming before enrollment – the device has the correct name from the start instead of being renamed later.
- Device based policy targeting – assign a device preparation policy directly to a device instead of using a user group. One user can enroll 5 devices and every device can get its own policy.
- Automatic corporate marking – associated devices are marked as corporate owned automatically so they are not blocked by personal device enrollment restrictions.
- Better onboarding security – the device identity is verified before enrollment with hardware attestation and TPM backed validation.
That 4th one is nice. If you block personally owned Windows devices with enrollment restrictions you had to upload corporate identifiers. Now you configure either corporate identifiers or device association. Not both.
Prerequisites
This is a bit more demanding than device preparation on its own so read this before you start.
Device preparation
- Windows 11 version 24H2 or later, or
- Windows 11 version 23H2 or 22H2 with KB5035942 or later
Device association
- Windows 11 version 24H2 or 25H2 with KB5120998 or later
- TPM 2.0, enabled and in a good state. Not in Reduced Functionality Mode. TPM attestation is enforced during the association.
- A physical device. Virtual machines are not supported.
- Supported editions: Pro, Pro Education, Pro for Workstations, Enterprise, Education and Enterprise LTSC
⚠️ That physical device requirement is the one that will hurt. Every Autopilot lab i have ever built was a VM and none of that works here. Device association uses hardware backed identity verification so you need real hardware. It also does not apply to Windows 365 Cloud PCs because those are already trusted corporate devices.
There is a second problem. A device that comes out of the box does not have KB5120998 installed yet, but you need that update before the OOBE where you export the device information. So what i ended up doing:
- Run the device through OOBE once with a local account
- Patch it
- Check the build with winver
- Reset it back to OOBE with Settings – System – Recovery – Reset this PC – Remove everything
Now you have a clean OOBE on a patched build. It is a bit silly but i did not find another way, other than building installation media that already has the update in it.
The setup
Empty tenant, physical laptop, let’s build it. I’m using the same step numbers as Microsoft so you can compare it with the tutorial.
Step 1: Windows automatic Intune enrollment
Go to the Intune portal – Devices – Enrollment – Automatic Enrollment.
Set the MDM user scope to All and leave the MAM user scope on None. Click Save.
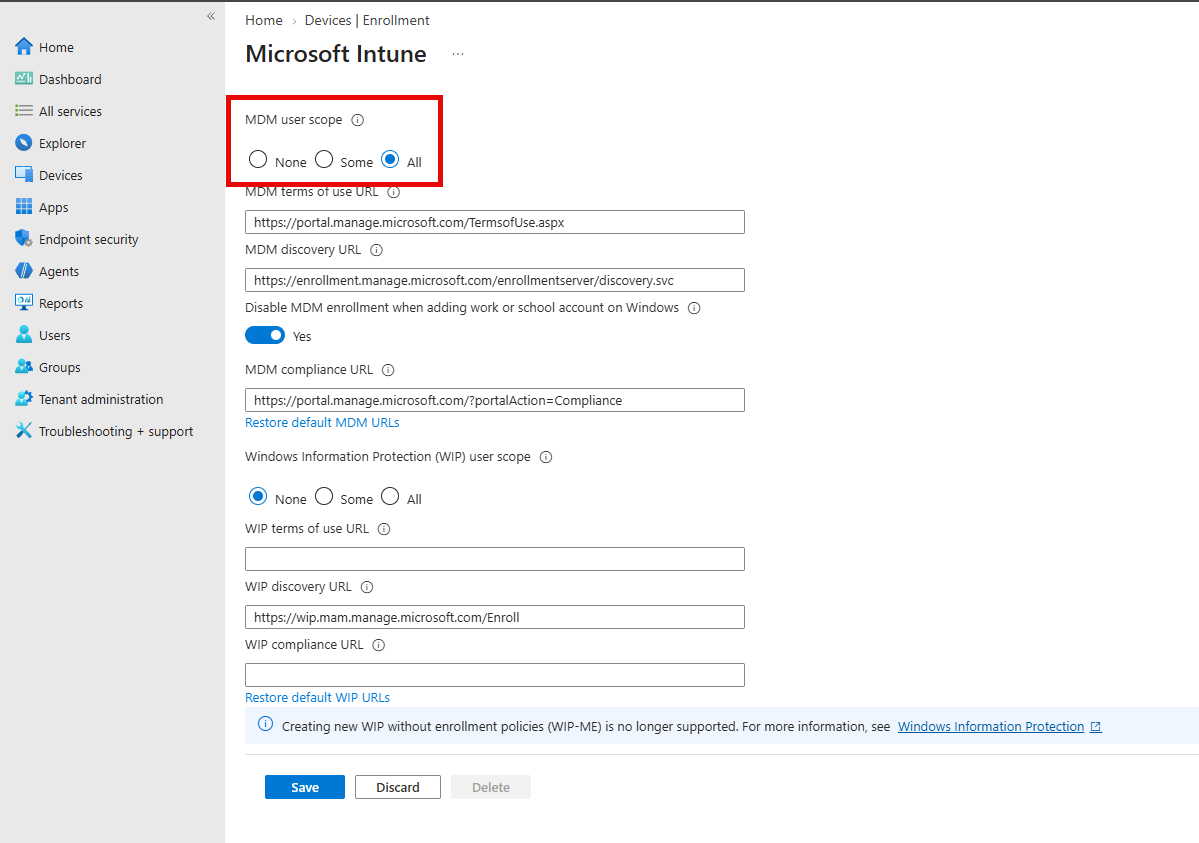
ℹ️ Easy one to skip but worth checking when you take over a tenant. If somebody set the MDM scope to Some with a group that means nothing anymore, device preparation just does not enroll and you will be looking in the wrong place for an hour.
Step 2: Allow users to join devices to Microsoft Entra ID
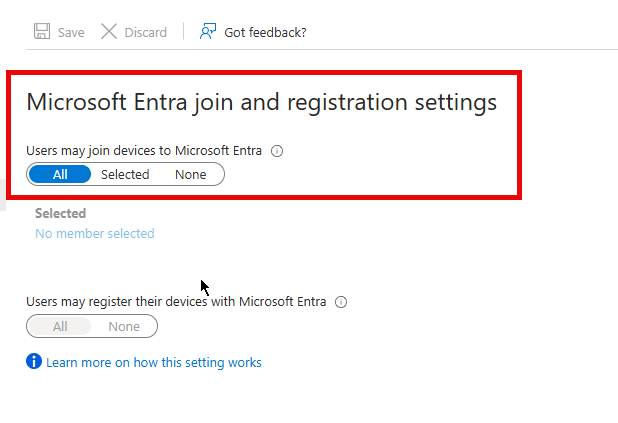
Go to the Entra portal – Identity – Devices – Overview – Device settings.
Under Users may join devices to Microsoft Entra ID select All, or Selected and add your test group. Click Save.
Step 3: Create an assigned device group
This is the step where things go wrong, especially the owner part.
Go to the Intune portal – Groups – All groups – New group.
- Group type: Security
- Group name: e.g. SG – Autopilot Device Preparation – Devices
- Microsoft Entra roles can be assigned to the group: No
- Membership type: Assigned. Not dynamic, device preparation does not use dynamic groups.
Now the important part. Under Owners click No owners selected and add the service principal Intune Provisioning Client with AppId f1346770-5b25-470b-88bd-d5744ab7952c.
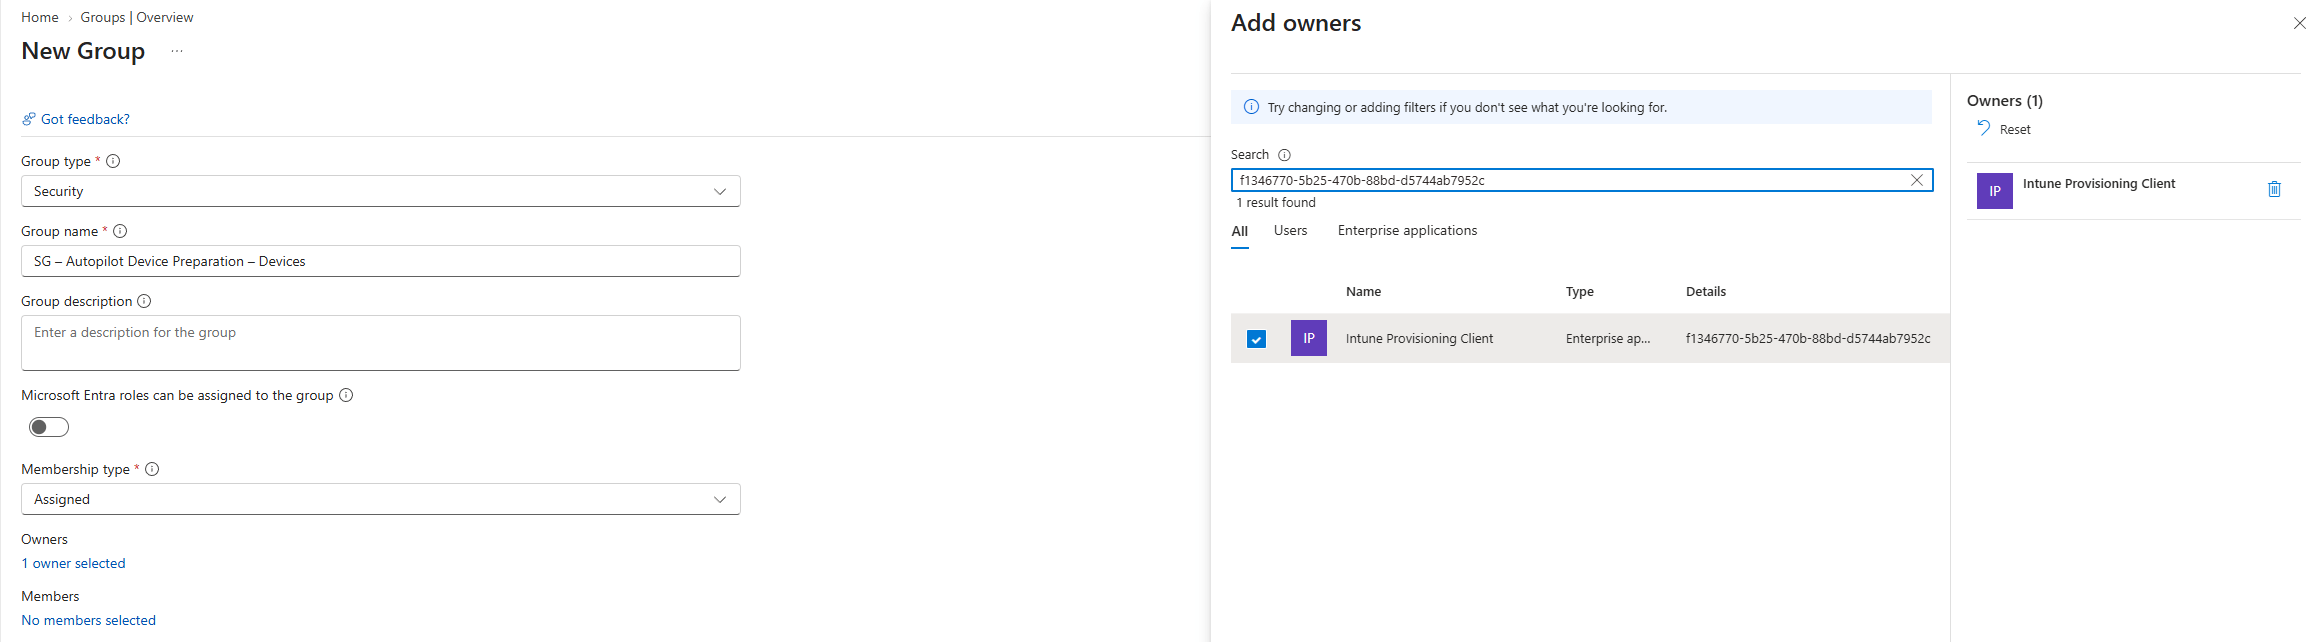
ℹ️ In some tenants this service principal is called Intune Autopilot ConfidentialClient. As long as the AppId is f1346770-5b25-470b-88bd-d5744ab7952c you have the right one.
If the service principal is not there at all, which can happen on a new tenant, you create it with Graph PowerShell:
Install-Module Microsoft.Graph.Authentication
Install-Module Microsoft.Graph.Applications
Connect-MgGraph -Scopes "Application.ReadWrite.All"
New-MgServicePrincipal -AppID f1346770-5b25-470b-88bd-d5744ab7952c
If it already exists you get a 409 Conflict that the name is already in use. That is fine, it just means you did not need to run it.
ℹ️ Don’t add devices to this group manually. Device preparation does that for you during the deployment.
Step 4: Create a user group
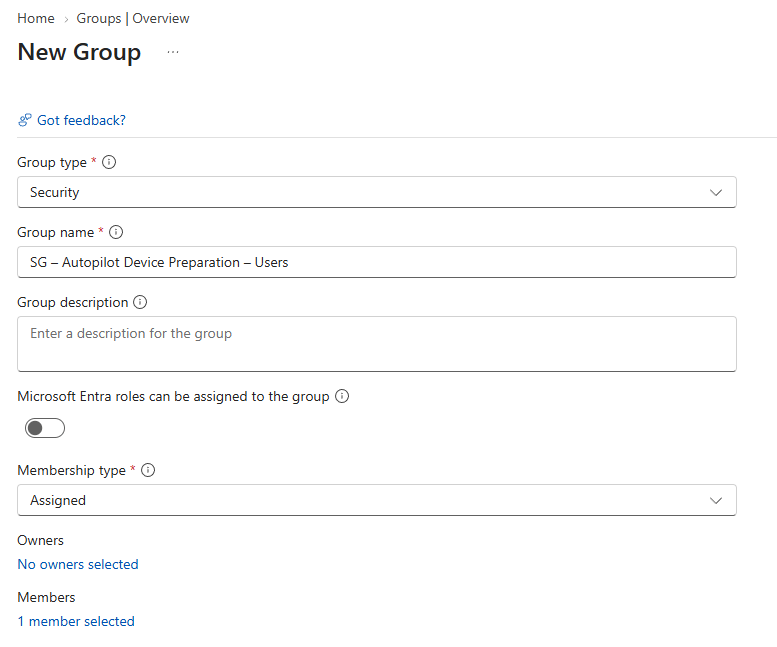
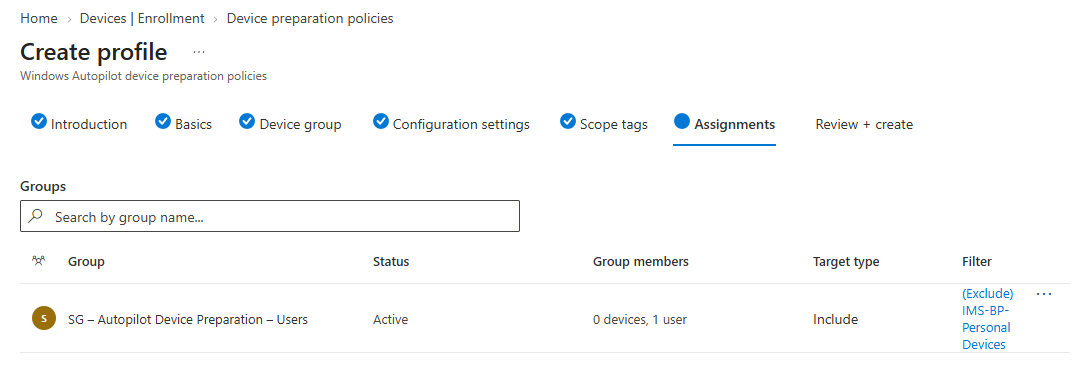
Same place, Groups – New group. Security group, e.g. SG – Autopilot Device Preparation – Users, and add your test user. Nothing special here.
Step 5: Assign apps and scripts to the device group
Everything you want installed during OOBE has to be assigned to the device group from step 3. Not the user group.
2 things people get wrong here:
- Apps have to install in System context, because this runs during OOBE when nobody is signed in.
- PowerShell scripts need Run this script using the logged on credentials set to No, for the same reason.
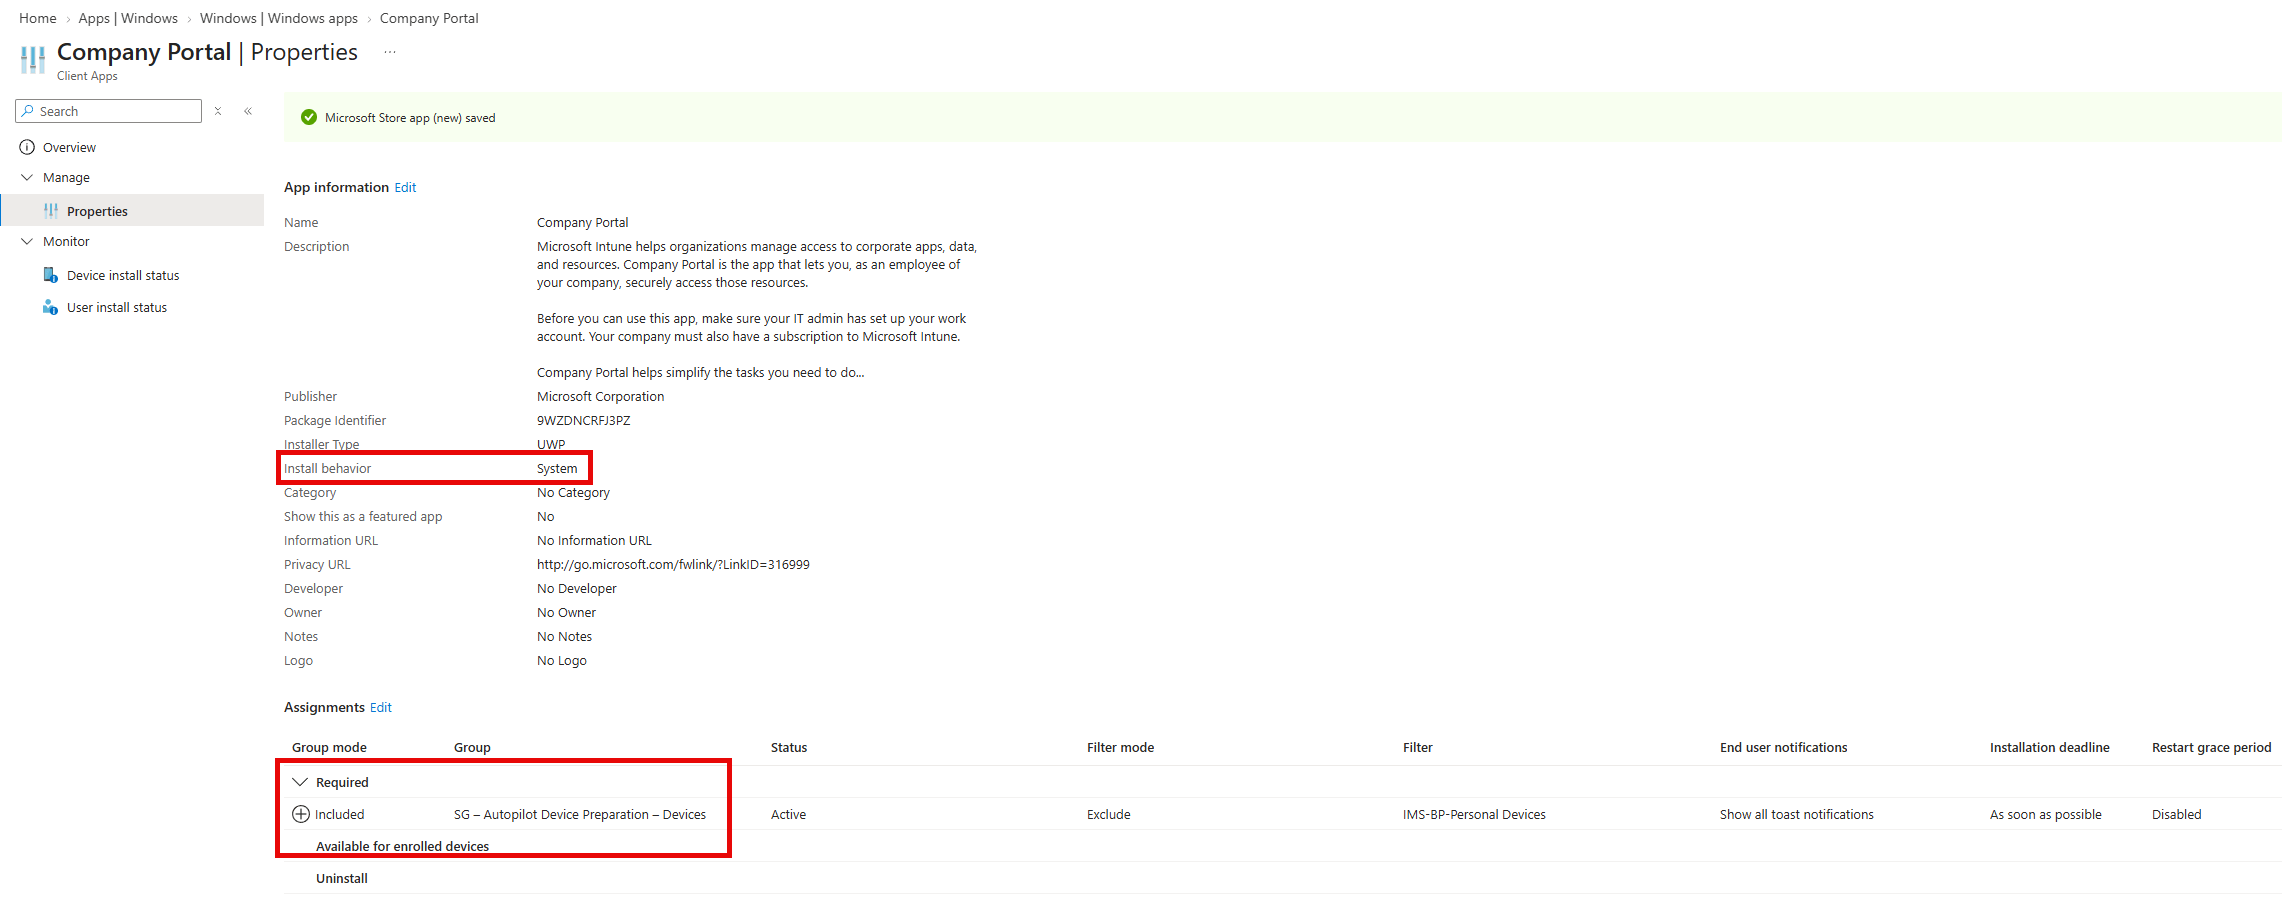
ℹ️ Whatever you assign here has to be packaged for System context, and it will be the version you packaged, so a brand new device is already behind on updates when the user hits the desktop. With 25 apps and 10 scripts as the ceiling and one timeout covering the whole deployment, keep OOBE to what the user needs in the first ten minutes and let your patching tooling catch up the rest afterwards.
Step 6: Create the device preparation policy
Go to the Intune portal – Devices – Windows – Enrollment – Device preparation policies – Create – User Driven.
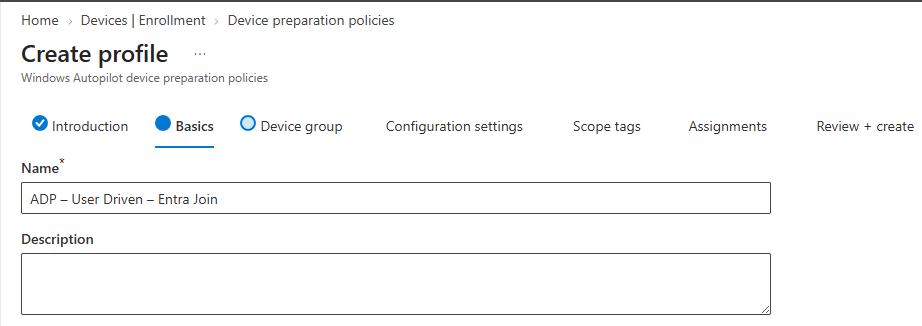
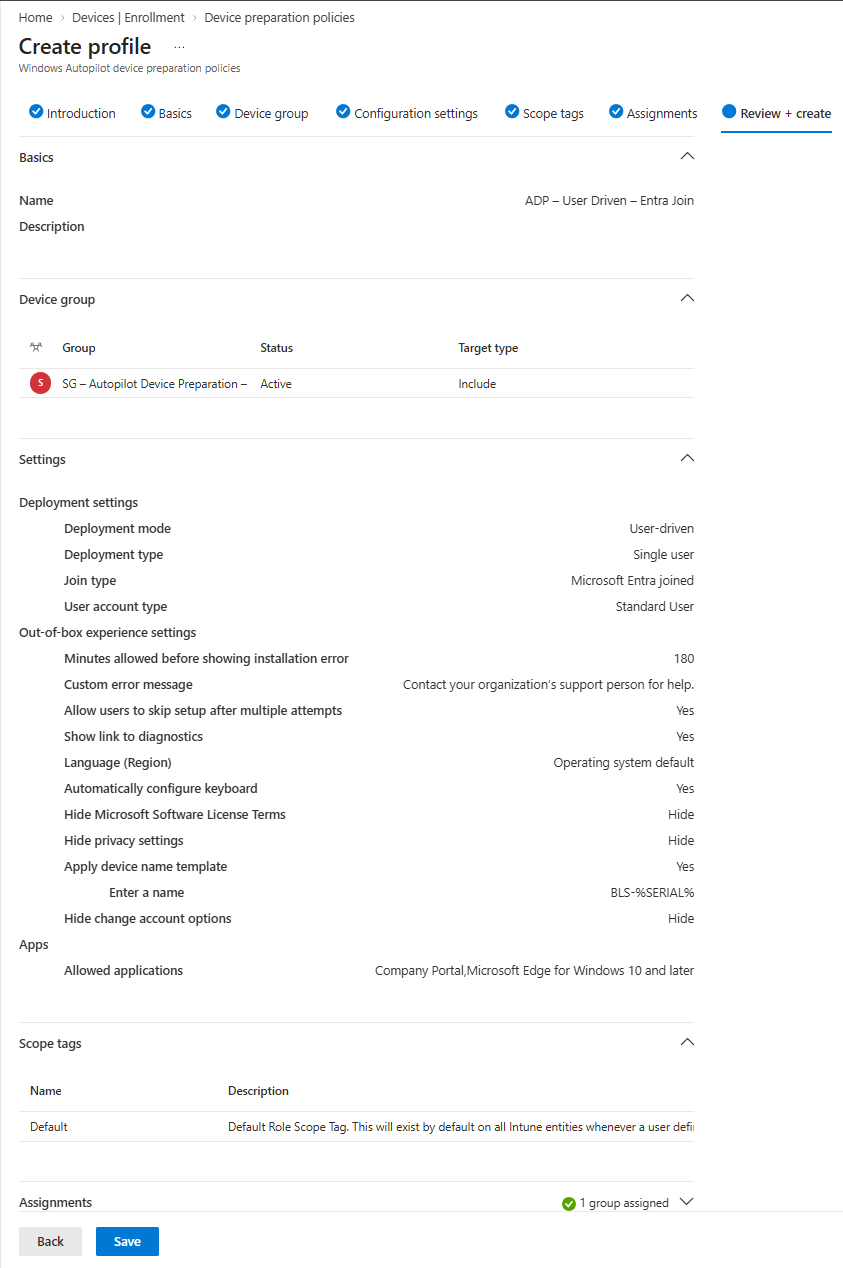
Give your policy a name e.g. ADP – User Driven – Entra Join and a description if you want. Click next.
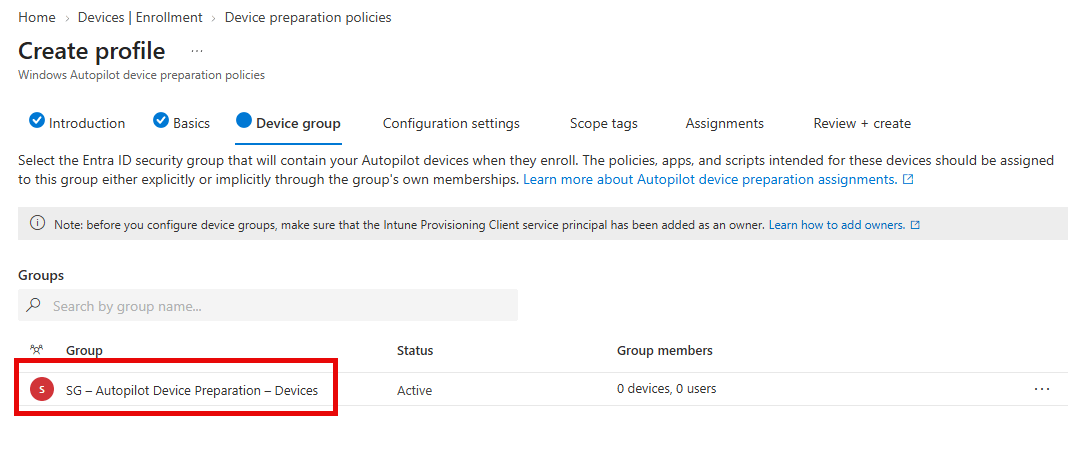
On the Device group page select the device group from step 3. Not the user group. I know i keep saying it but this is the mistake i see the most.
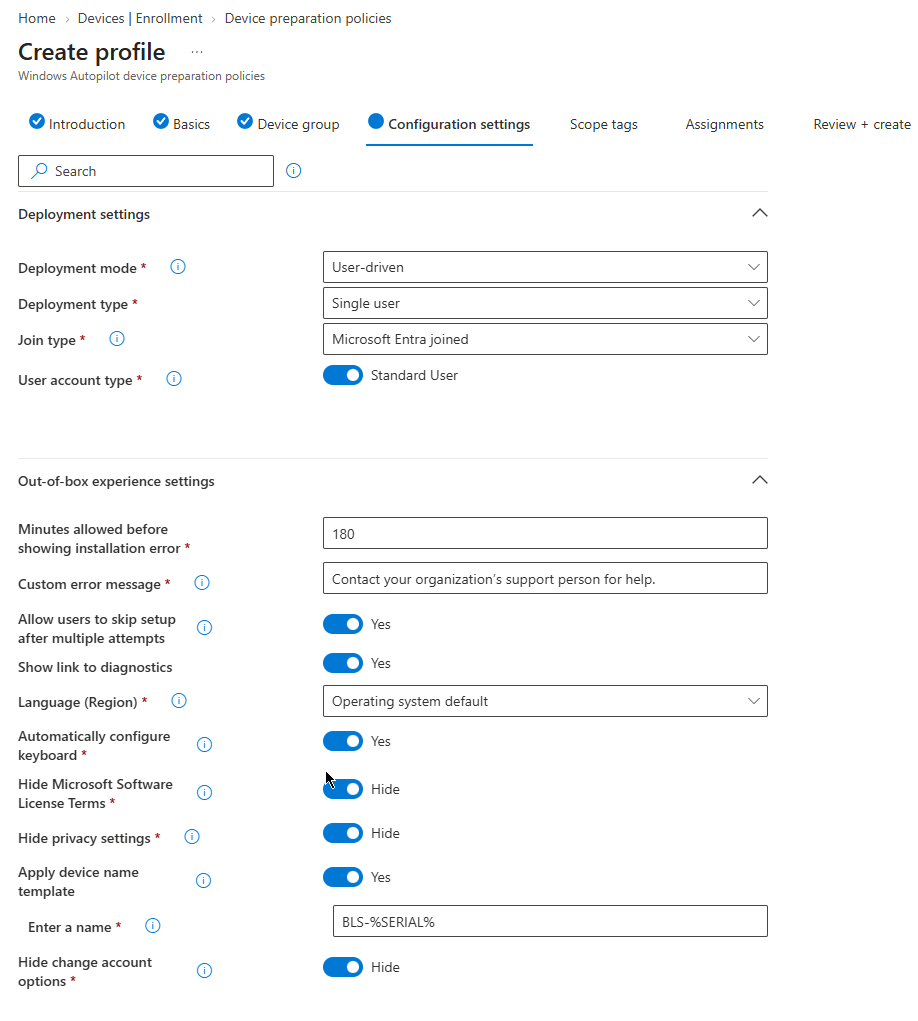
On the Configuration settings page open Deployment settings:
- Deployment mode: User-driven
- Deployment type: Single user
- Join type: Microsoft Entra joined
- User account type: Standard User or Administrator, up to you. With Standard User the deployment removes the user from the local Administrators group before it finishes.
Under Out-of-box experience settings you set the timeout (15 to 720 minutes, this is for the whole deployment and not per app), a custom error message, if users can skip setup after multiple attempts and if you want to show a diagnostics link when it fails.
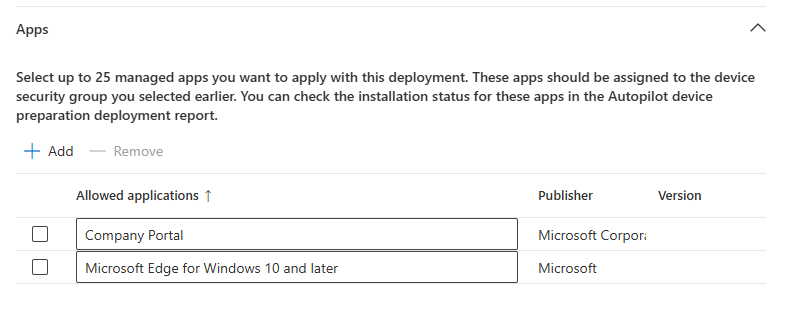
Then Apps (max 25) and Scripts (max 10), scope tags if you want, and on the Assignments page you select the user group from step 4. Click create.
ℹ️ If you assign multiple device preparation policies to the same user the one highest in the list wins, so the smallest number in the Priority column. You can drag them to reorder. When you show Hide change account options you must configure company branding in Microsoft Entra ID
⚠️ Make sure your test device is not registered as a classic Windows Autopilot device. If it is, the Autopilot profile wins and you will be watching the wrong deployment run while nothing you configured happens. Unless the device is associated, then device preparation wins. More on that below.
Step 7: Device Association
Now the new part. Everything above gives you a working device preparation deployment, this is what makes it device first.
The flow is: export the device info from the device, upload it in Intune, let the device complete the association during OOBE.
Export the device information from OOBE
Boot the device into OOBE and stop at the region selection page. Don’t click through and don’t complete the setup.
Now press the Windows key 5 times, quickly. The Autopilot menu opens. It is a hidden page and this is the documented way to get in.
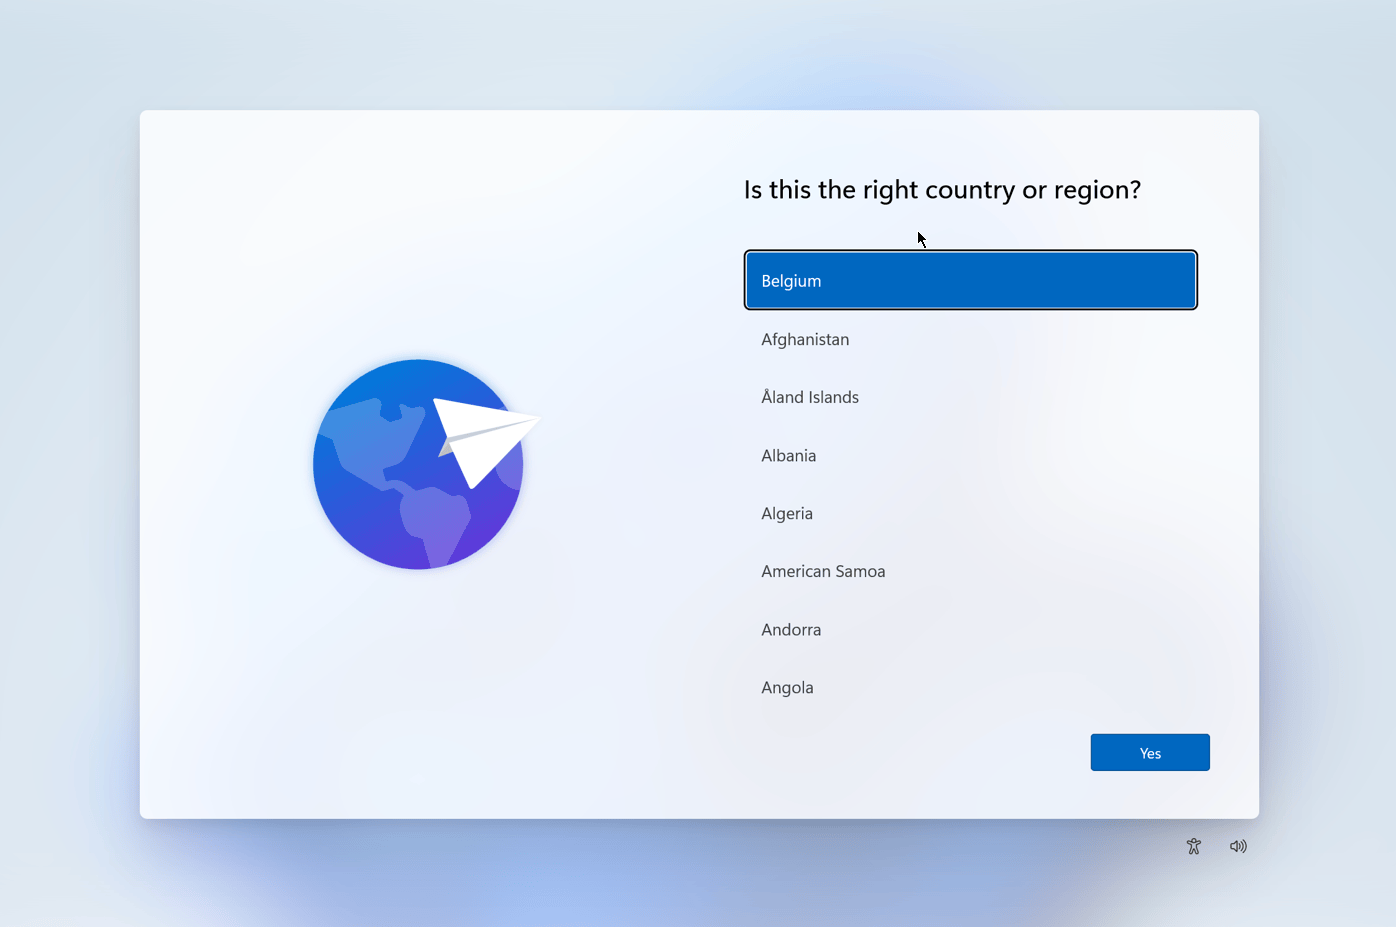
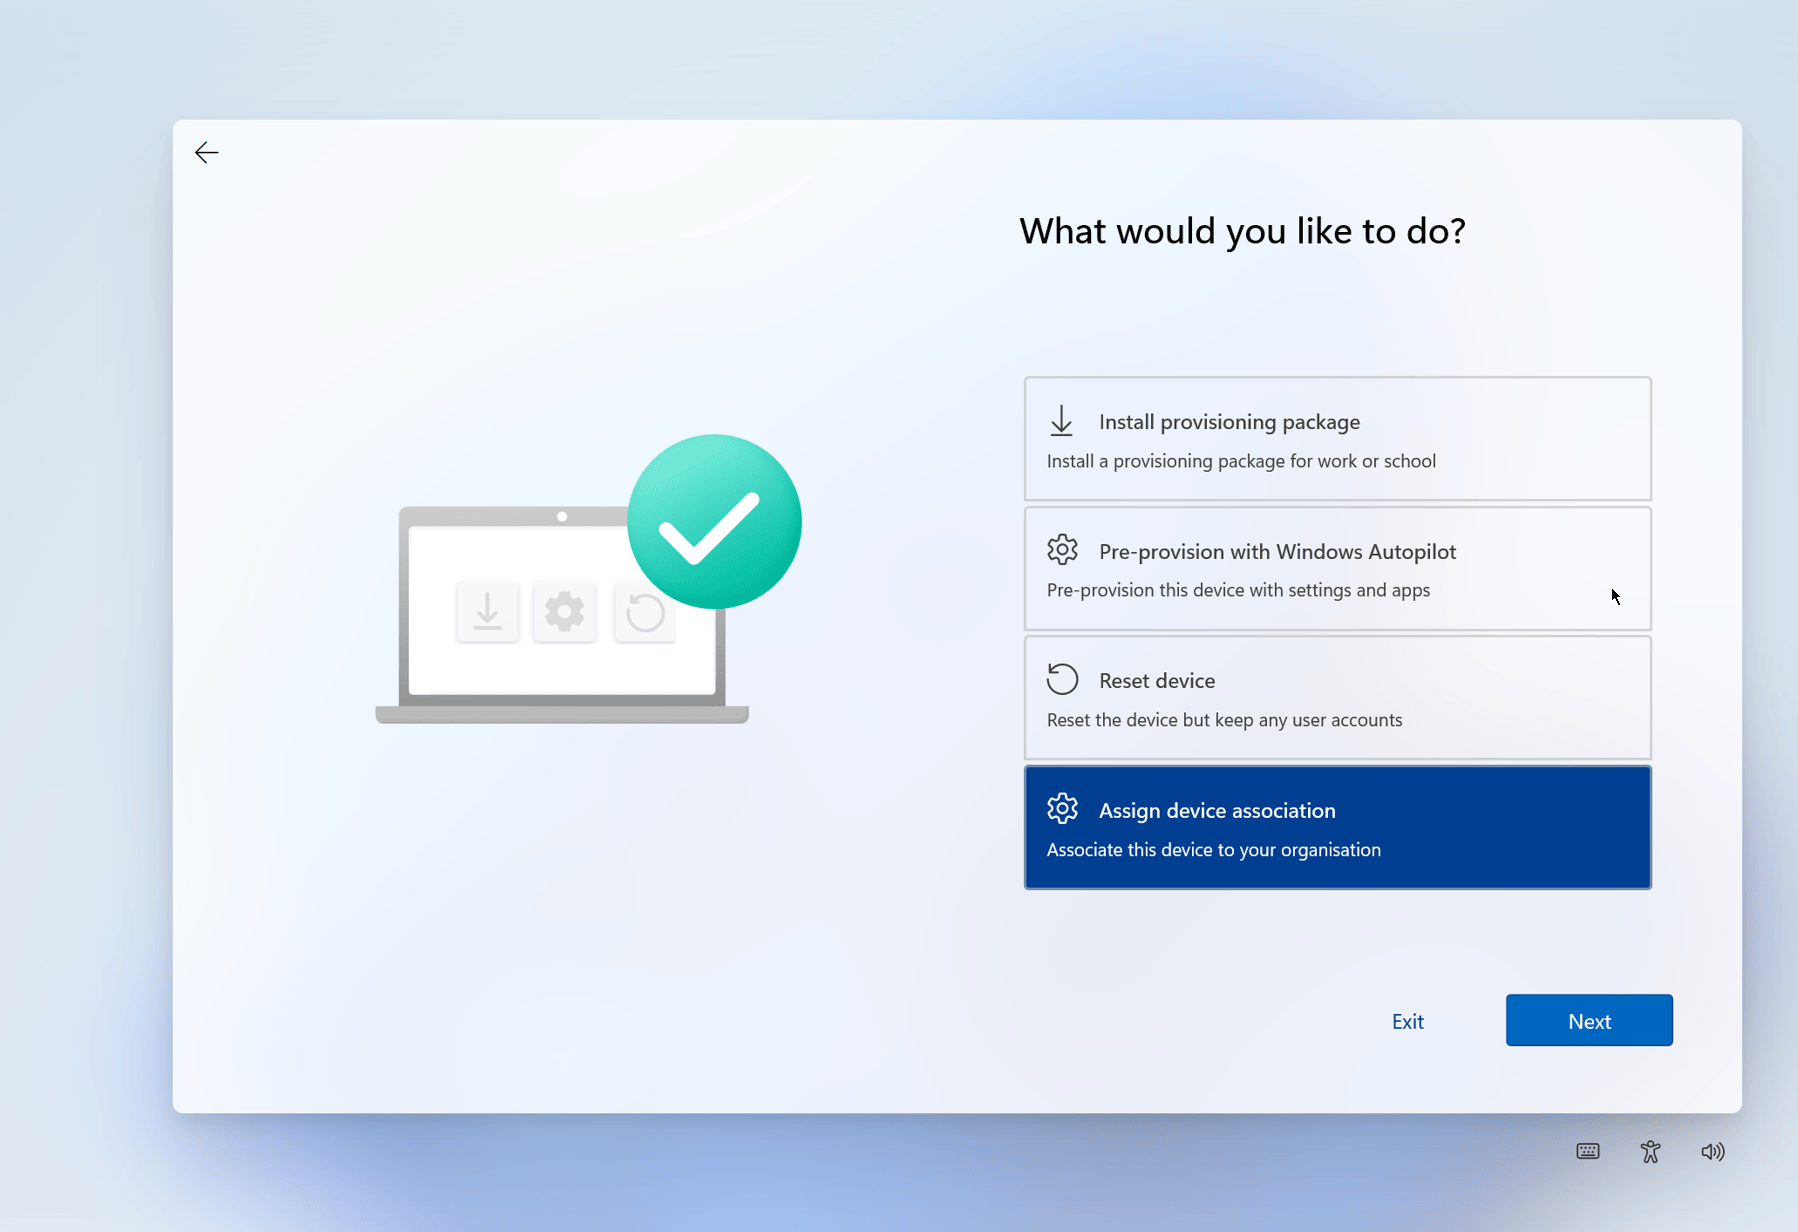
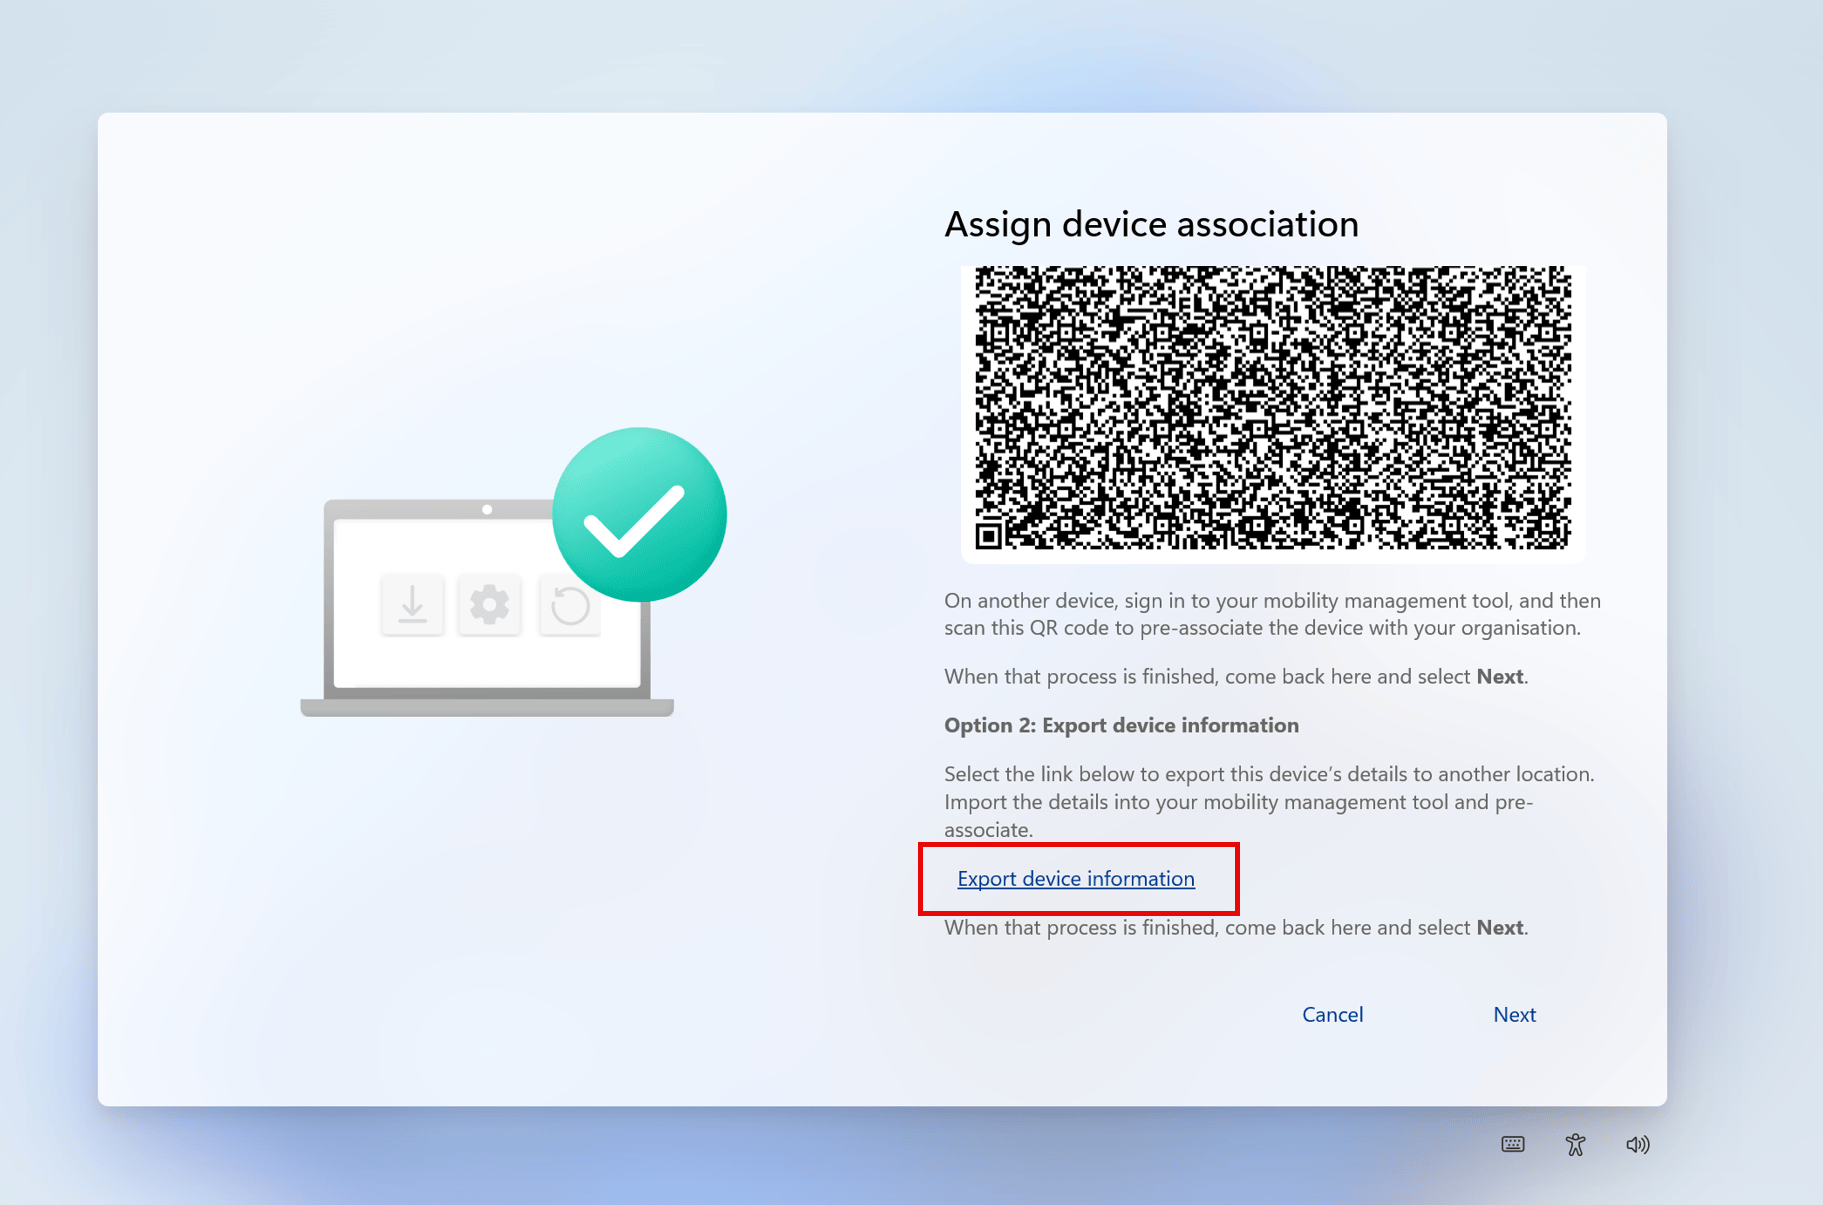
You get 2 options, Scan QR code and Export device information. Select Export device information.
ℹ️ Intune only accepts the CSV from option 2 at the moment. The QR code option is meant for a custom app that calls Microsoft Graph to pre-associate the device, so unless you built that you can ignore it.
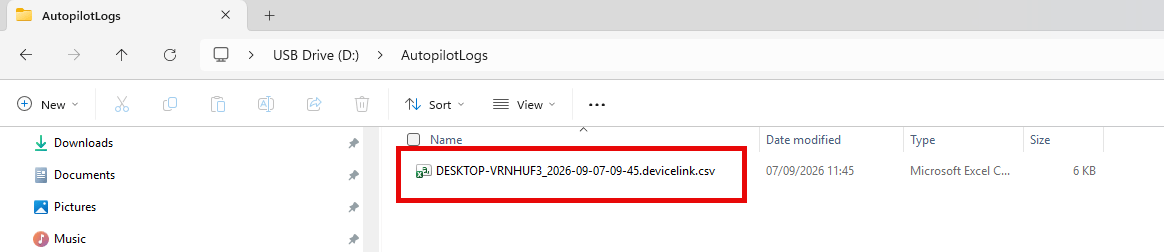
Plug in a USB drive formatted with NTFS and select Export device information. The DeviceLink CSV is written to the stick.
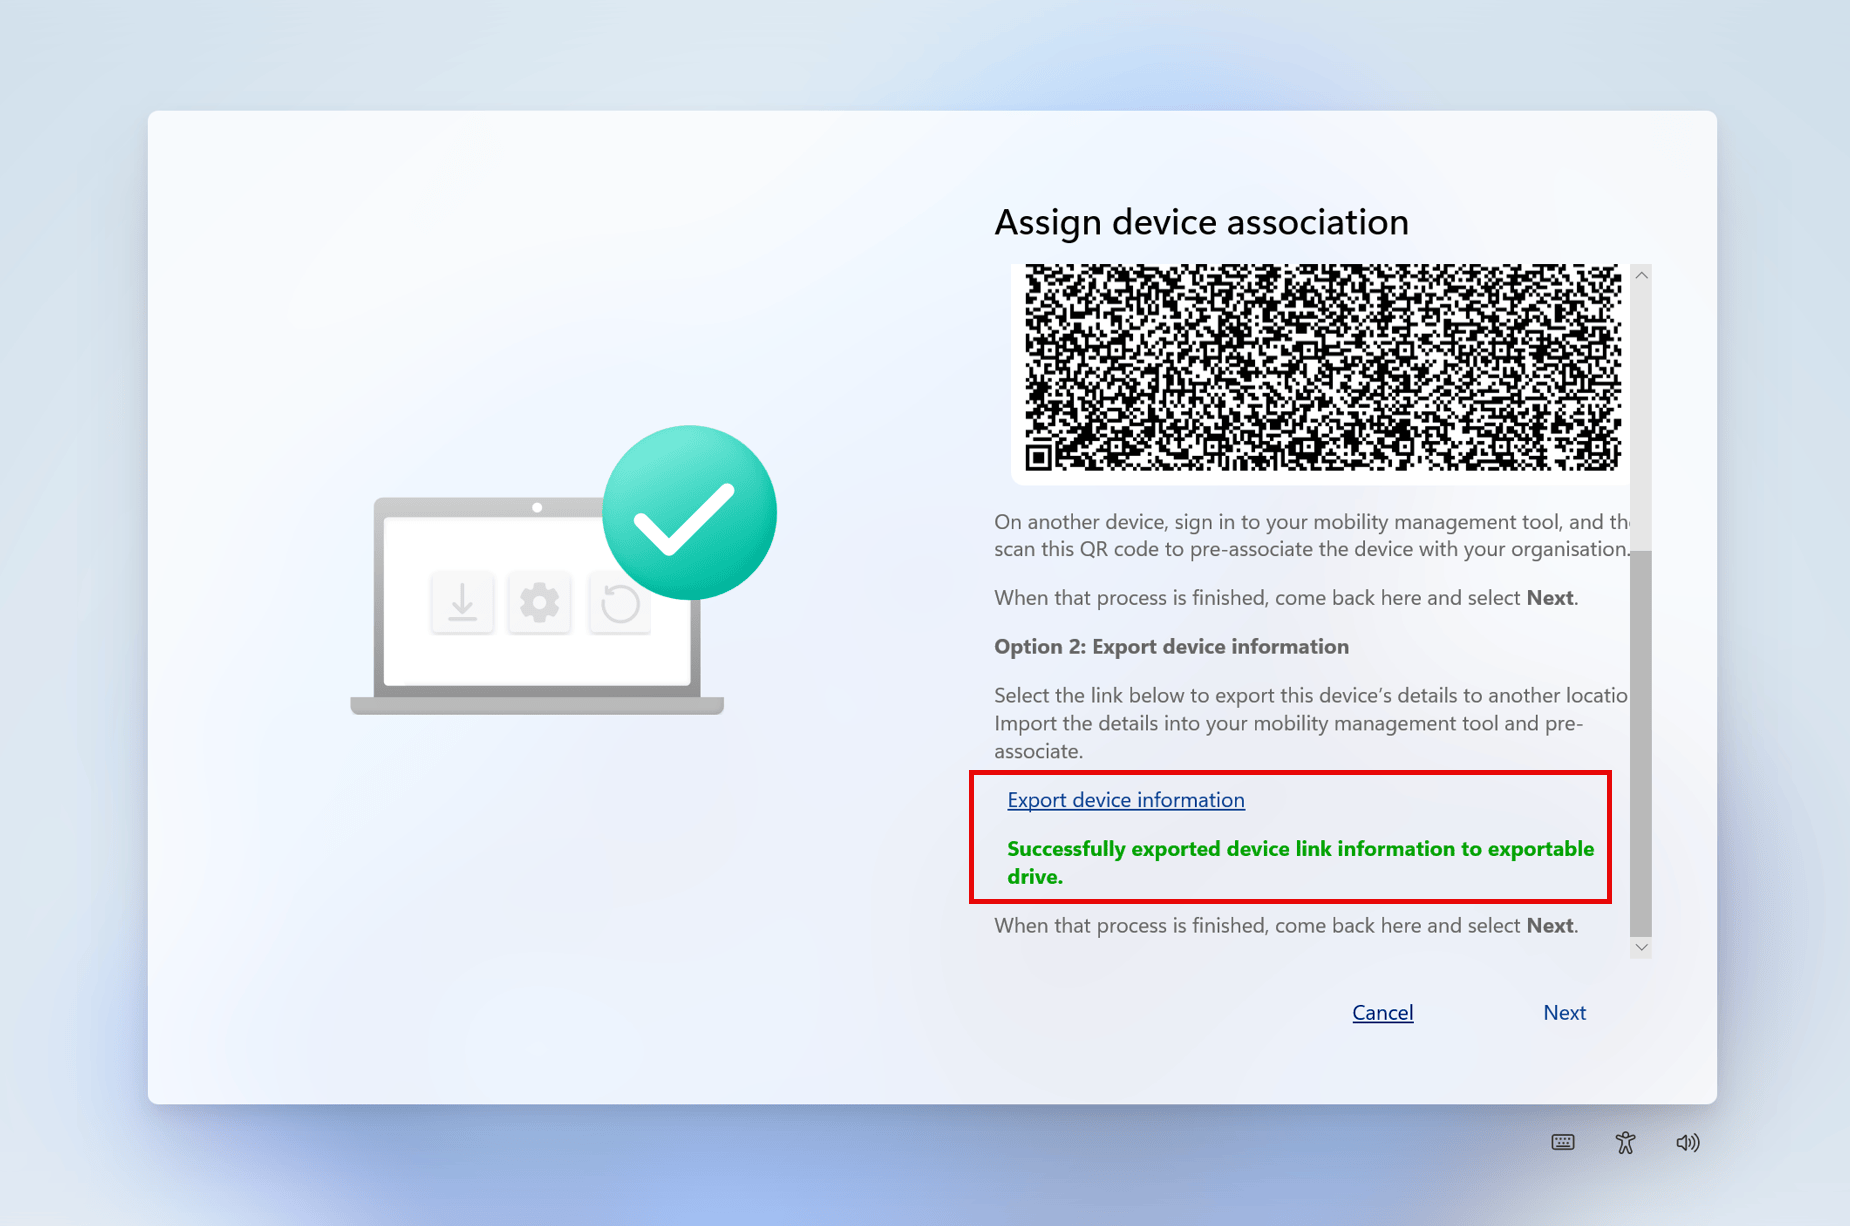
⚠️ You have about 3 minutes before the export gives up. Put the USB stick in before you open the menu, not after. Don’t leave the screen on the device, you can continue from here after the Complete the association section a bit further in this blog.
ℹ️ Small tip that has nothing to do with Autopilot but i get asked this a lot. You cannot use the Snipping Tool in OOBE, but you can press Shift+F10 for a command prompt and run a small PowerShell script that captures the screen with .NET and writes the PNGs to your USB stick. That is how i took the OOBE screenshots in this post instead of taking a picture with my phone. Download the script here.
Get the CSV from a device that is already set up
If the device is already past OOBE you cannot open the Autopilot menu anymore. But you can still get the DeviceLink CSV because it is in the Autopilot diagnostic logs. There are 3 ways to get it.
Option 1, remotely from Intune. This is the nice one.
Go to the Intune portal – Devices – All devices – select your device – Collect diagnostics.
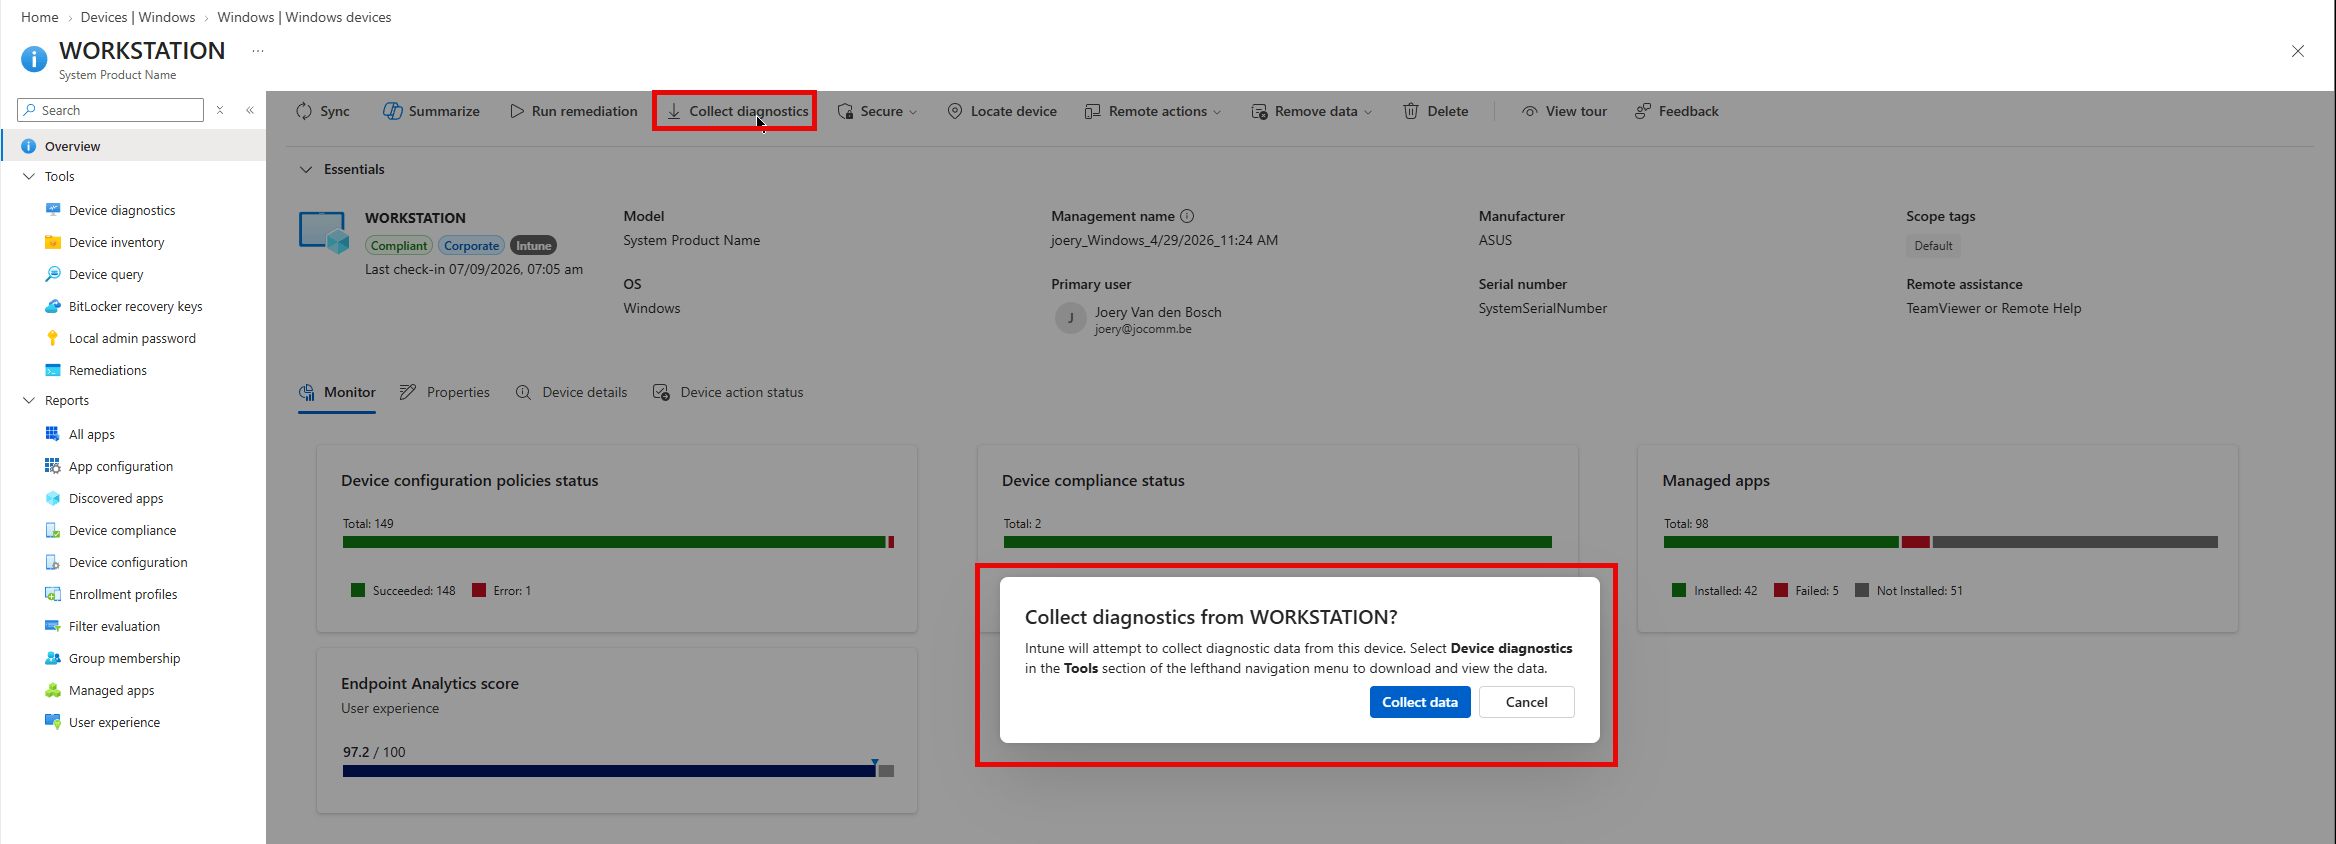
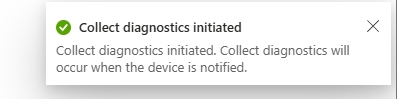
Confirm it and Intune queues the request. For me it took a few minutes. When the upload is done go to the Device diagnostics view of the device and download the package.
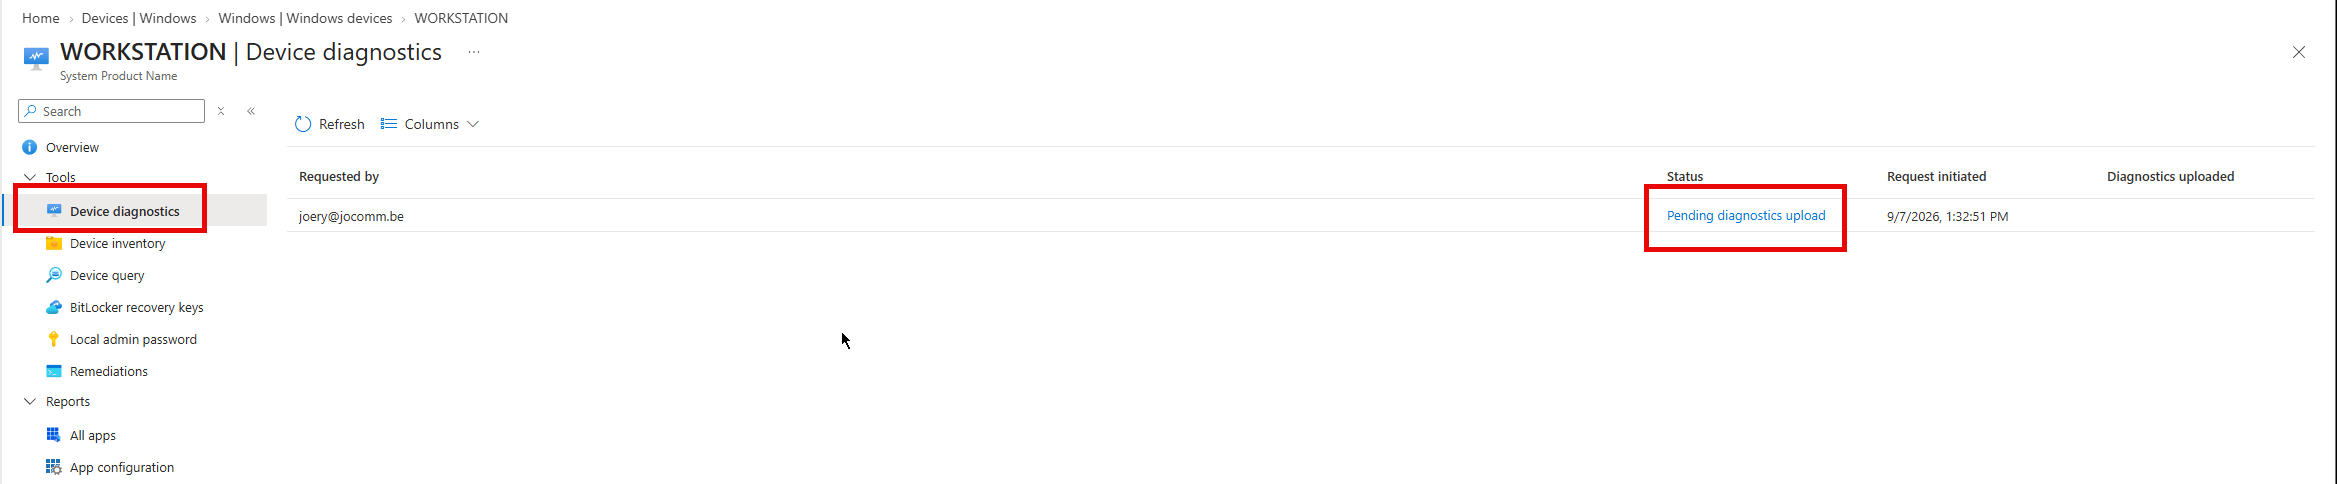

Unpack it and get the DeviceLink CSV out of it. That is the file you upload in Intune. It is in this path: DiagLogs-WORKSTATION-20260907T113723Z\(74) FoldersFiles temp_MDMDiagnostics_mdmlogs-2026-09-07-11-32-54_cab , in here there is a CAB file, open it the file is in there and it has an extention with .devicelink. That is the file you need
ℹ️ I think this option is underrated. You can associate devices that are already deployed without touching them, without a USB stick and without going to the device. If you want to add association to an existing device fleet this is the way to do it. You can only get this file from a device that has been enrolled with Device Preparation already, if your device is enrolled with APv1, there is no .devicelink file in the cab file.
Option 2, on the device from Settings. Go to Settings – Accounts – Access work or school and under Related settings select Export your management logs – Export. Follow the path it shows you.
Option 3, on the device from a command prompt. From an elevated prompt:
MdmDiagnosticsTool.exe -area Autopilot -cab C:\Diagnostics\Autopilot.cabAnd get the DeviceLink CSV out of the cab file.
Pre-associate the device in Intune
Copy the CSV to a machine that can reach the Intune admin center.
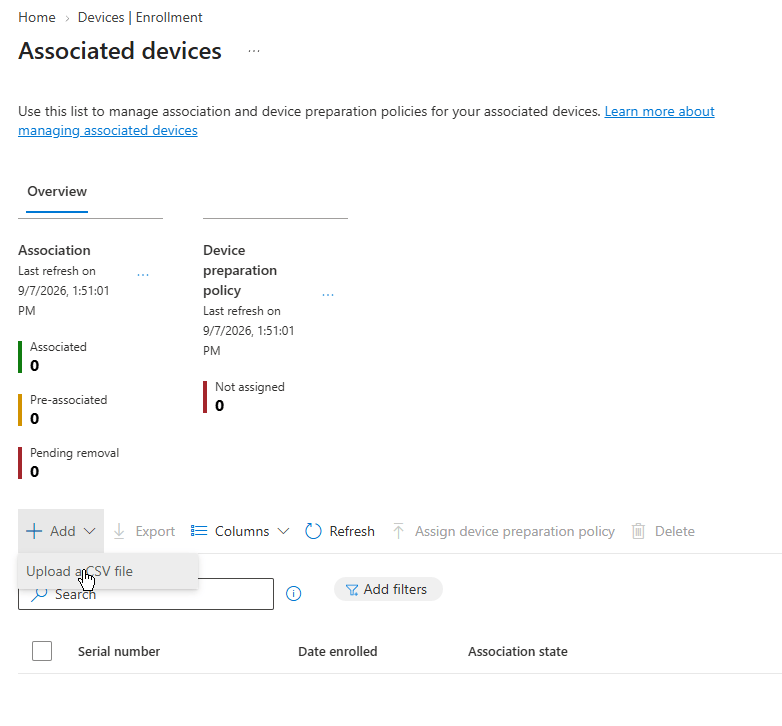
Go to the Intune portal – Devices – Enrollment – Device association – Devices – Add.
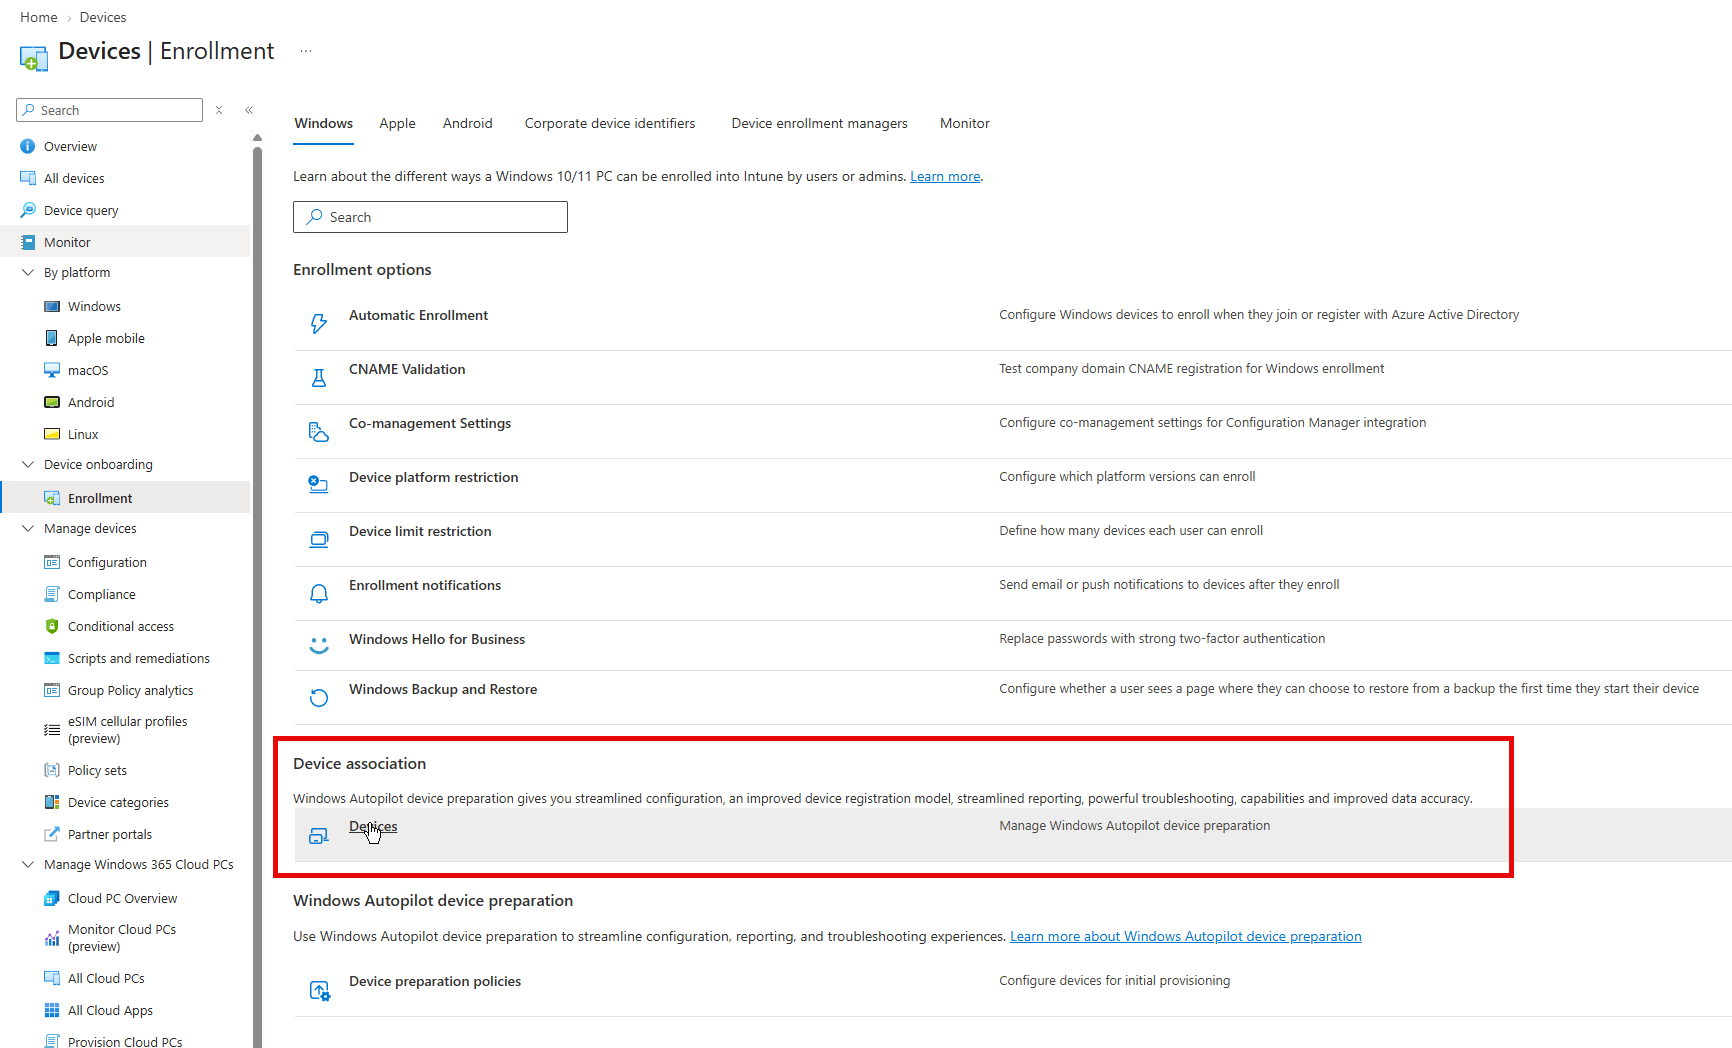
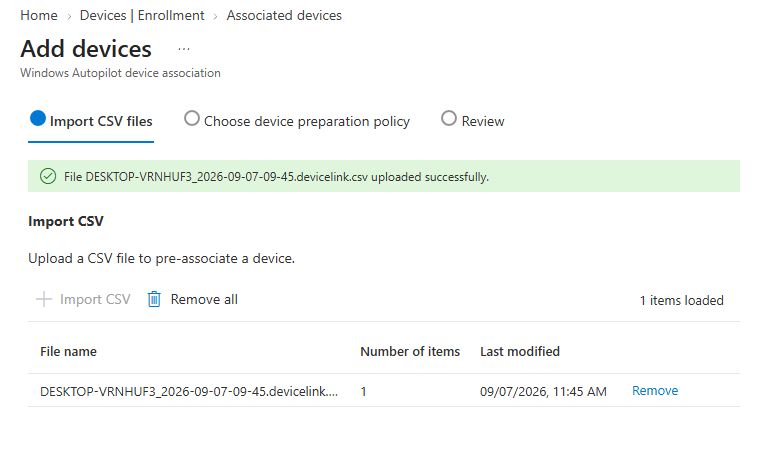
On the Import CSV page click Browse and upload your file. Click next.
On the Assign device preparation policy page select the policy you created in step 6.
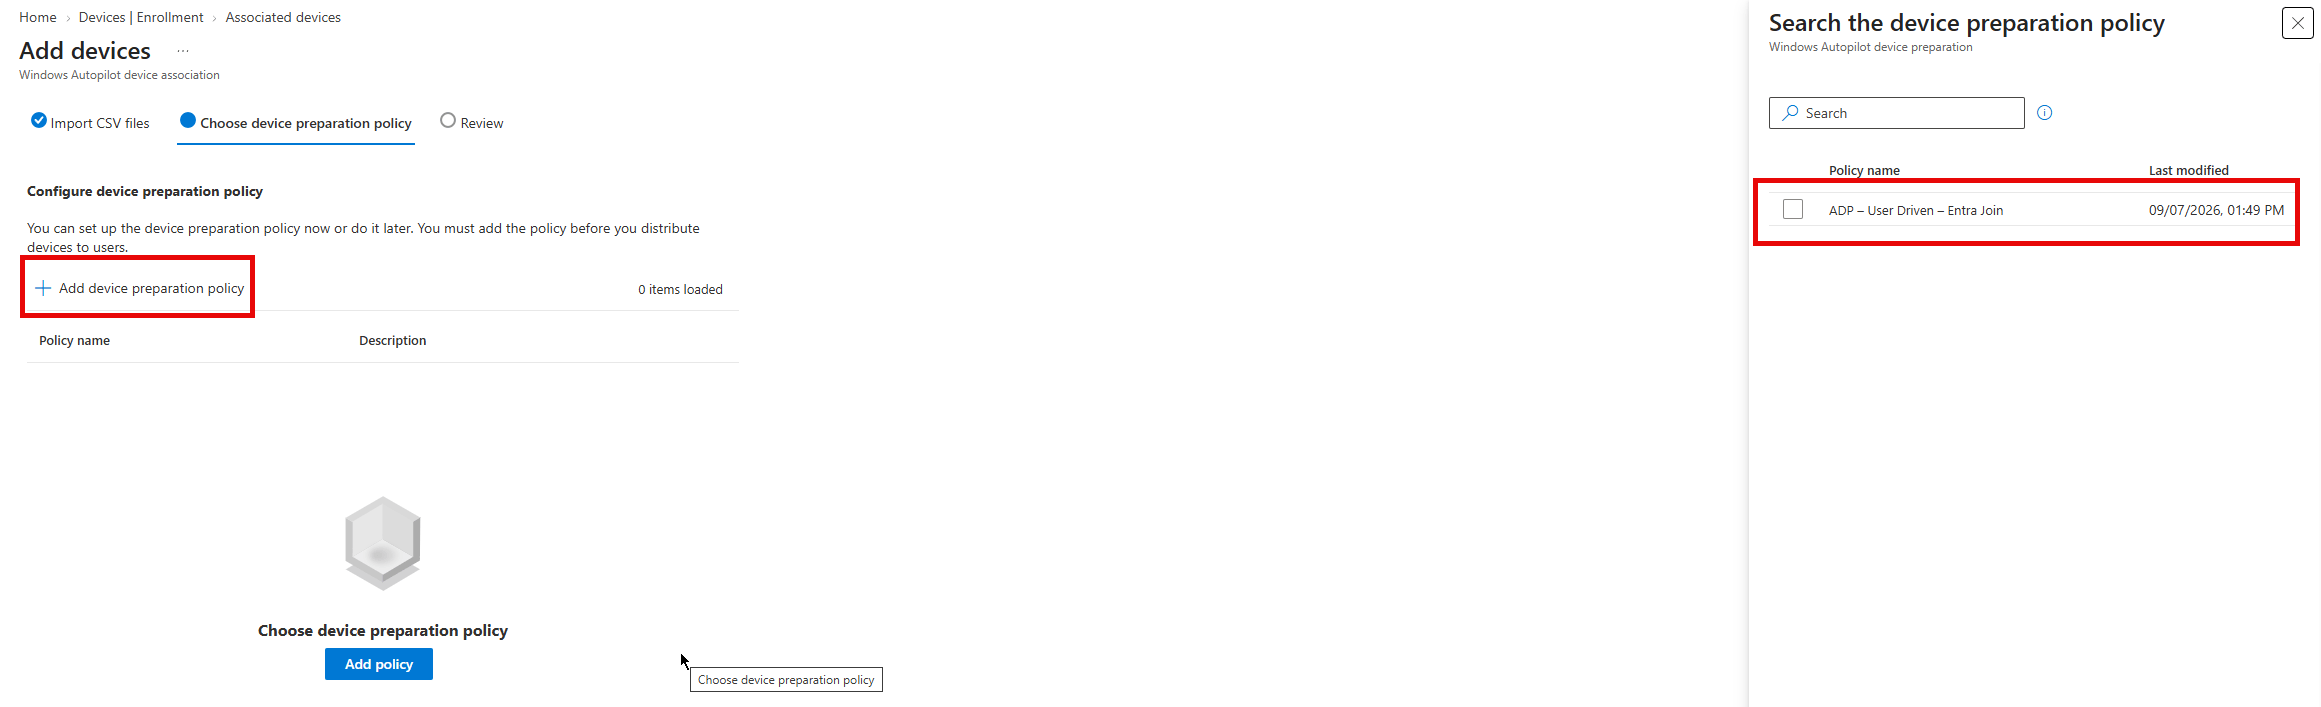
⚠️ Do not skip this. If you don’t assign a policy here the device falls back to the device preparation policy of the user that signs in. And if that user has no policy assigned then no device preparation policy is applied at all. The device just enrolls and nothing you configured happens. So assign the policy here.
Click next, check the import summary and click Add. The device is now in the list with association state Pre-associated.
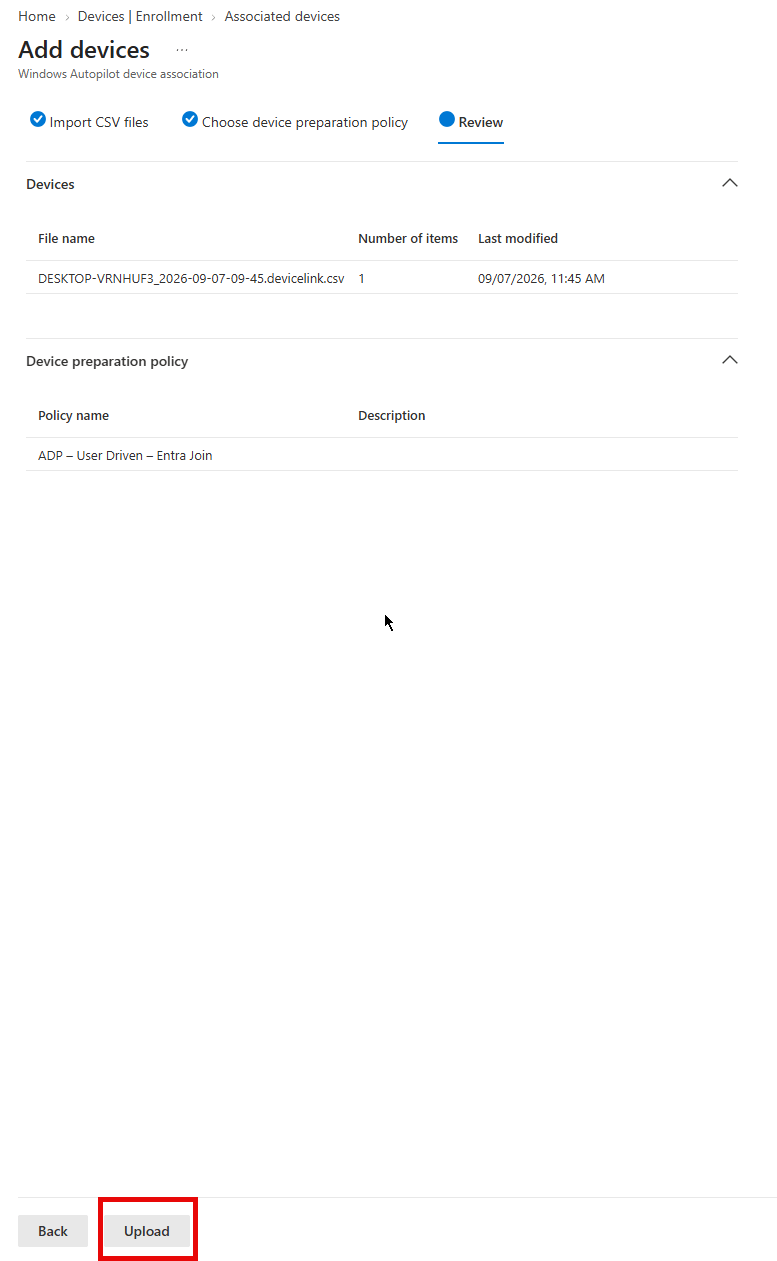
⚠️ And here is the big one: 1 device per CSV file. There is no bulk upload. 20 laptops means 20 CSV files and 20 times this wizard. I come back to this at the end.
Complete the association
The association completes automatically when the pre-associated device connects to a network during OOBE. It finds the pre-association record and writes the marker to UEFI. On the device click next, wait a couple of seconds and the device wioll tell you Device Association complete.
If you are standing at the device you don’t have to wait. On the device click next, wait a couple of seconds and the device wioll tell you Device Association complete.
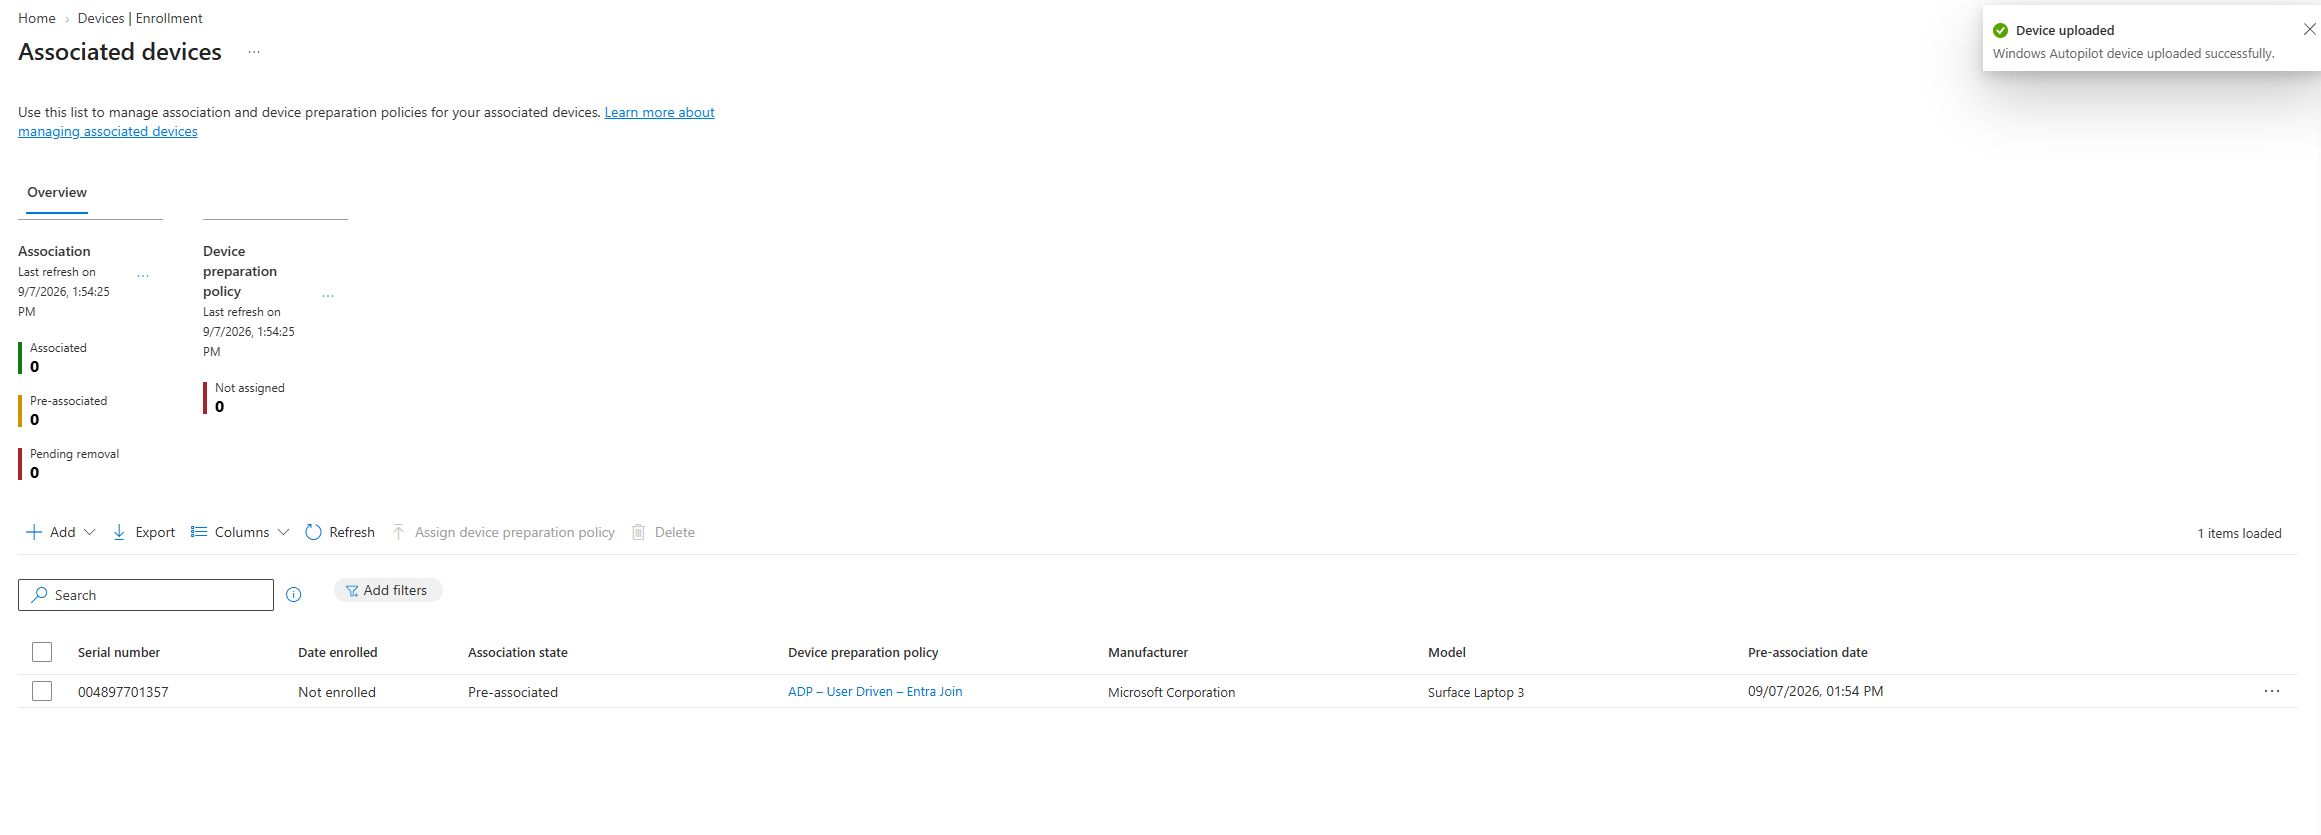
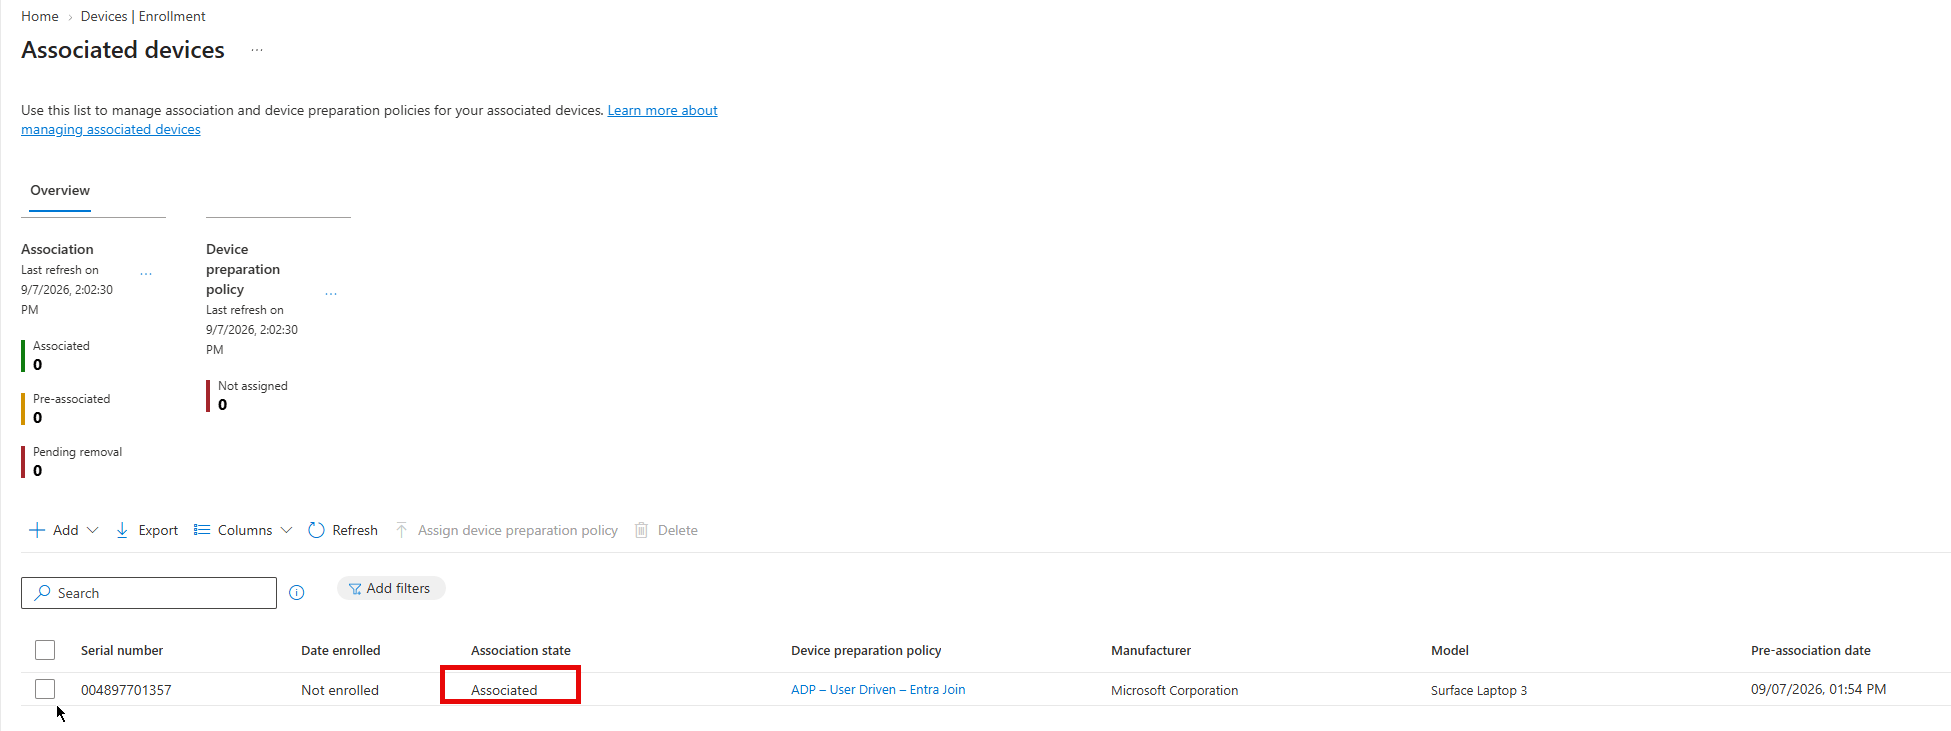
And in Intune the state changes from Pre-associated to Associated.
The extra OOBE settings you get
When you work with associated devices the user-driven device preparation policy gets a set of OOBE settings that are not there otherwise. These are applied before the enrollment.
- Language (Region) – set the language for the device
- Automatically configure keyboard – skip the keyboard selection page
- Hide Microsoft Software License Terms – skip the EULA
- Hide privacy settings – skip the privacy page. When you hide the privacy settings the location services are disabled by default.
- Hide change account options – removes the change account options on the company sign-in and domain error pages. This one needs company branding configured in Entra ID.
- Apply device name template – name the device during enrollment. Max 63 characters, letters, numbers and hyphens, and it cannot be only numbers. Use %SERIAL% for the serial number and %RAND:x% for a random number where x is the amount of digits.
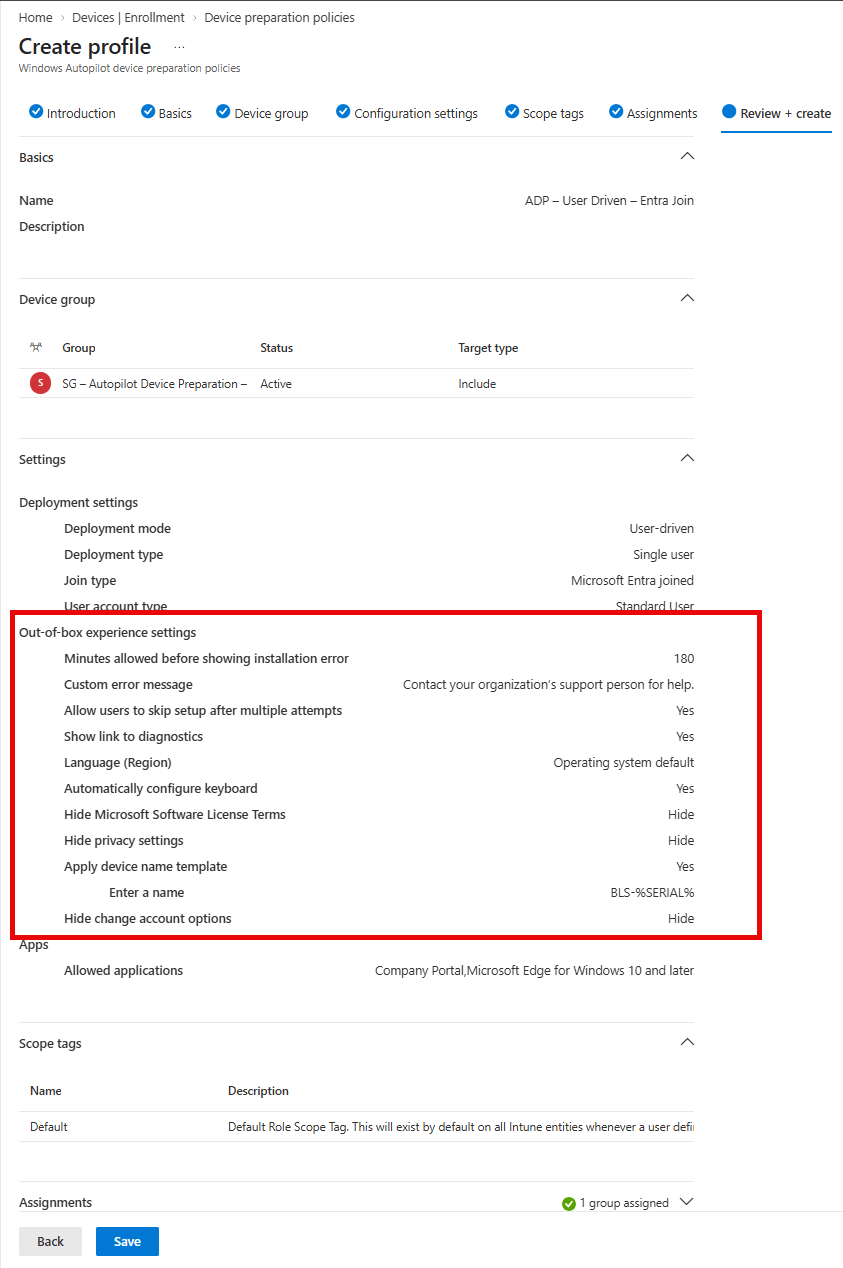
ℹ️ 2 things in this list that are easy to miss. When the device uses Wi-Fi during OOBE the language and keyboard selection screens are not hidden, so use a cable if you want that clean experience. And on Windows Professional editions the Personal account / Work and school account page is hidden by default for all associated devices, you don’t have to configure anything for that.
Association states and lifecycle
3 states you will see in the Device association blade:
- Pre-associated – added with the CSV and waiting to complete the association in OOBE
- Associated – the UEFI marker is written and the device is ready to enroll
- Pending removal – a remove-association request is being processed
You can filter on state, policy, manufacturer and model and search on serial number or device name.
Resetting an associated device
The tenant affinity is in UEFI so a reset, a Windows reinstall or removing the enrollment does not remove the association. That is on purpose and it is a good thing, it means an internal redeploy keeps working the way you configured it.
ℹ️ After a reset and a new enrollment the Entra ID and Intune device records are not reused, new records are created. So clean up the old ones or your device list becomes a mess.
Uploading a new CSV for a device that is already pre-associated
If the hardware identity did not change the existing record is updated. Handy when you only want to change the assigned policy.
If the hardware identity did change, and that happens when somebody clears UEFI with a script, resets the BIOS settings or toggles Secure Boot, the service cannot match it to the original device anymore. A new record is created and the old one becomes stale.
Stale pre-association records are deleted automatically after 360 days so you don’t have to clean those up.
Removing an association
This part is still rough. You cannot remove an association from Intune. The tenant affinity is stored on the device so you have to run a PowerShell script locally on the machine.
Which means physical access. Microsoft is clear about the security model here, the person with physical access to the device is the owner from an association point of view.
You only need to do this when the device permanently leaves your tenant. Sold, recycled or transferred. Not for an internal redeploy.
ℹ️ If you clear the association locally while the device is still enrolled in Intune, the MDM provider will just associate it again on the next check-in. If the device is not enrolled anymore Intune never finds out and the record stays stale. So the order matters when you decommission a device.
Together with classic Autopilot
You can run both in the same tenant, that works fine. The rule is simple:
- Device not associated → the classic Windows Autopilot registration wins
- Device associated → the device preparation deployment wins
So you can start with device association without breaking what you already have. You can even pre-associate a device that is already registered for classic Autopilot and when it goes through OOBE the association wins.
Doing this for more than 1 device
Now back to that 1 device per CSV thing.
With classic Autopilot there is a manufacturer doing the registration for you. The hardware is registered before the box is even sealed and the device arrives already knowing where it belongs. Device association does not have that. There is no factory step, so you are doing it yourself.
For every device: press the Windows key 5 times, export to USB with 3 minutes on the clock, walk to a machine with a browser, sign in, upload the CSV, pick a policy, walk back and press Next. For 1 or 2 devices that is fine. For 20 it is not.
Classic Autopilot solved this years ago with Get-WindowsAutopilotInfo -Online. Device association was released without something like that, so Rudy Ooms wrote it. I did not have the time to fully test it out.
Get-AutopilotDeviceAssociation
It is on the PowerShell Gallery so from an elevated 64-bit PowerShell session:
Install-Script -Name Get-AutopilotDeviceAssociationThere are 3 things you do with it.
Associate the device:
Get-AutopilotDeviceAssociation -Action FullYou run this on the device. It gets the identity from the machine, registers it in Intune against a device preparation policy, waits until Intune knows the device and then tells Windows to get its signed association. So everything the manual steps do but without the manual steps.
Test the association:
Get-AutopilotDeviceAssociation -Action ReadAssociation -Validate -OnlineThis one is the most useful in my opinion. The association has an expiry date, which i did not know. So a device can look associated while it is not, and nothing in the portal tells you that. This checks if it is really there, if it is still valid and if it belongs to that machine.
Remove the association:
Get-AutopilotDeviceAssociation -Action RemoveAssociation -DeleteCloudAssociationThis clears the firmware marker and the record in Intune. Use -WhatIf the first time if you want to see what it is going to do. Removing the association does not unenroll the device.
⚠️ The interfaces behind this are still beta so they will change and the script will have to change with them. And running it unattended means credentials in a script, which is a whole other discussion. For a staging bench where you sign in once it is exactly what you need.
ℹ️ All credits to Rudy, go read his post Windows Autopilot Device Association: somebody has to be the OEM. The script is on GitHub and on the PowerShell Gallery.
Final thoughts
Device association is a good feature and the security model makes sense. Tenant affinity in UEFI, TPM attestation, it survives a reset and the device is corporate owned automatically. The device trust is now before the enrollment instead of after it, which is where it should be.
But it was released without the thing that made classic Autopilot work at scale, which is somebody else doing the registration. Right now that somebody is you, with a USB stick, 1 device at a time. That is fine for a pilot and not fine for a rollout. Until the OEMs pick this up you will need Rudy’s script or your own tooling on the Graph API.
What i would do today is enable it for the scenarios where it pays off immediately. Shared devices where 1 user enrolls multiple machines and every machine needs its own policy. Environments where you block personal enrollments and you are tired of corporate identifiers. And everywhere the device name has to be correct from the first boot. Those work today.
For a refresh of a 1000 devices i would wait for the tooling, or script it.
And as always if you feel there is something in error or you want to add some stuff from your own experience don’t hesitate to contact me!